Clever Space-Saving Ideas to Optimize Every Corner of Your Home
In an era where urban living spaces are shrinking and the desire for organized, functional homes is growing, mastering space-saving techniques has never been more crucial. This comprehensive guide delves into innovative strategies to transform every nook and cranny of your home into efficient, stylish areas. From multifunctional furniture to vertical storage solutions, we will explore a myriad of ideas tailored to different rooms, ensuring you can maximize square footage without compromising on aesthetics or comfort.
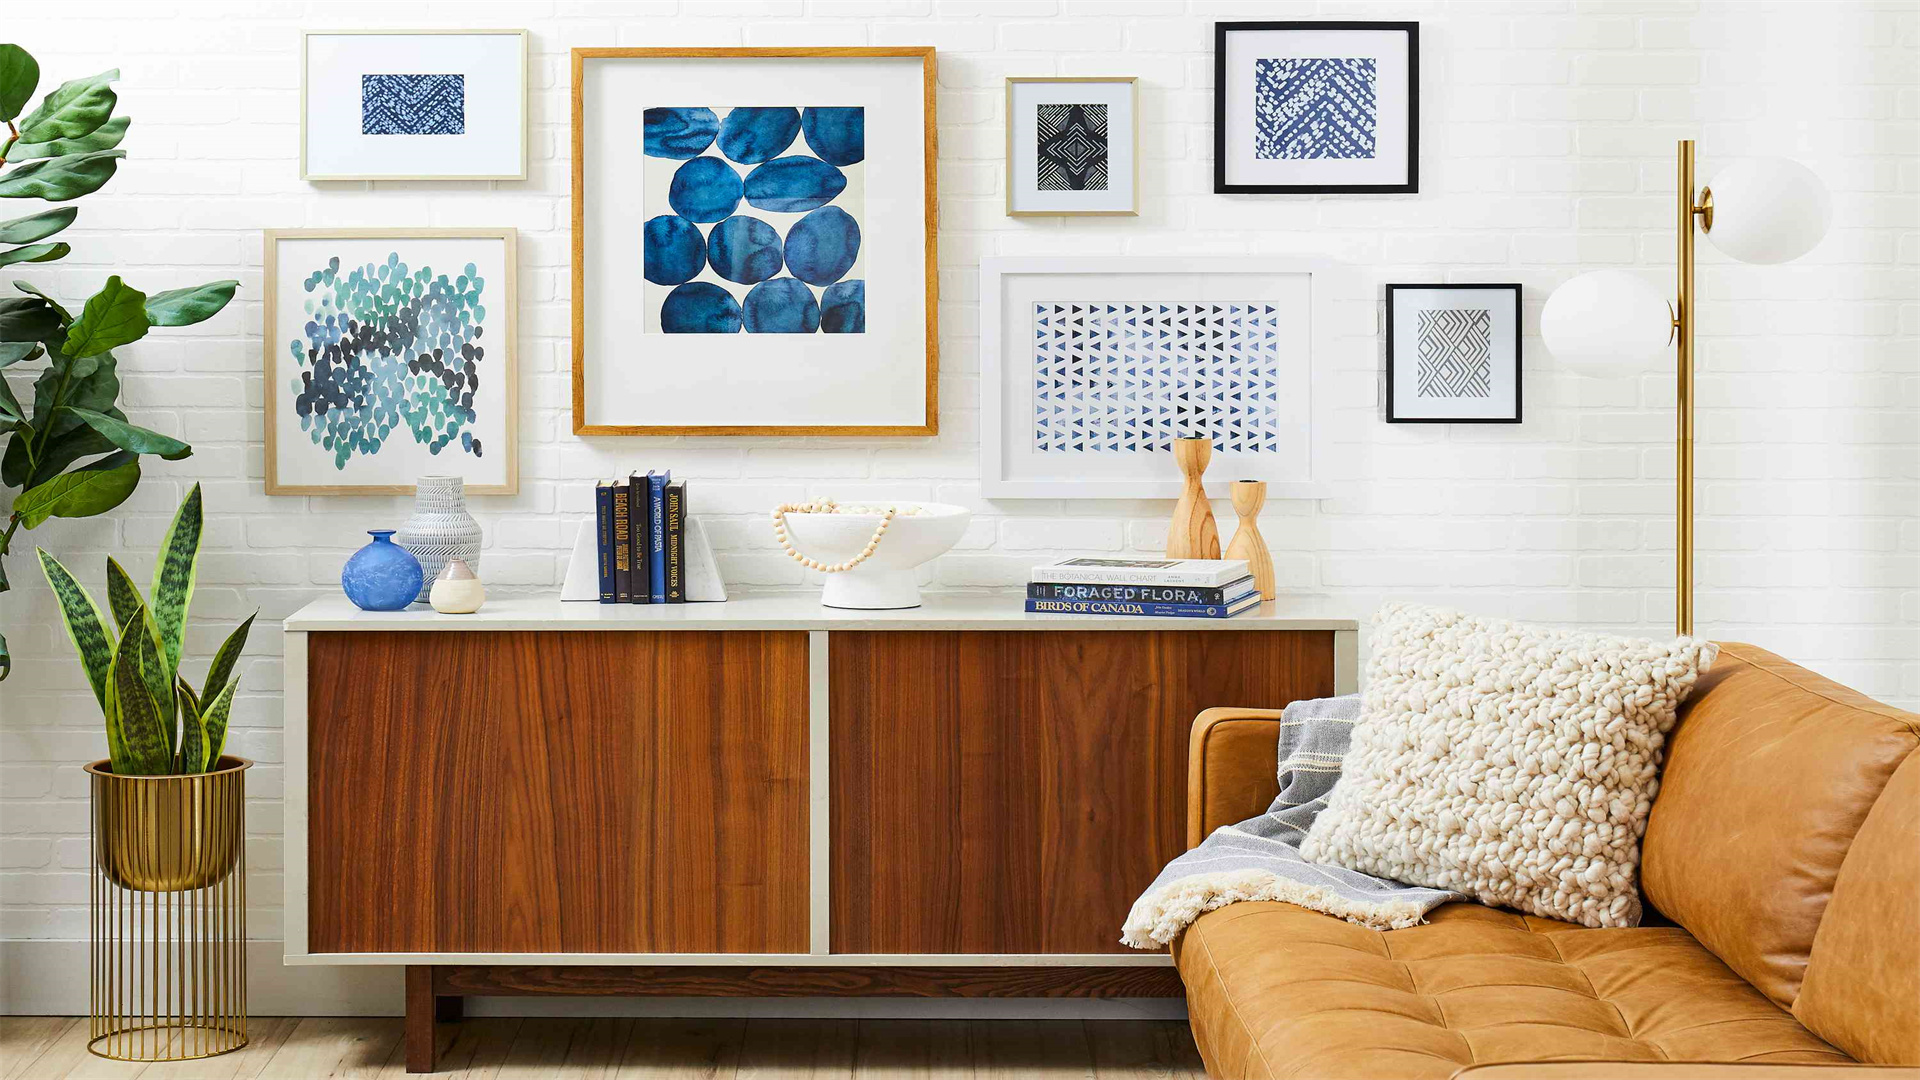
🏠 Living Room: The Heart of Your Home
The living room often serves as a multifunctional hub for relaxation, entertainment, and socializing, making space optimization key. Here, we discuss three clever ideas to save space, each with its pros, cons, and implementation steps.
🔧 Method One: Multifunctional Furniture
Multifunctional furniture, such as sofa beds or storage ottomans, doubles up to serve multiple purposes, reducing clutter and enhancing utility. This approach is ideal for small apartments or open-plan living areas where every piece must earn its keep.
Advantages
- Maximizes functionality without occupying extra floor space, allowing for flexible room layouts.
- Reduces the need for additional storage units, cutting costs and minimizing visual clutter.
- Enhances home versatility; for example, a sofa bed can quickly transform a living room into a guest bedroom.
- Often incorporates modern designs that add aesthetic appeal to contemporary interiors.
- Can improve organization by providing hidden compartments for items like blankets, books, or electronics.
Disadvantages
- May be more expensive than standard furniture due to complex mechanisms and dual purposes.
- Some pieces can be heavier or bulkier, making them difficult to move or rearrange.
- Durability might be compromised if the furniture is used frequently for multiple functions.
- Limited style options compared to traditional furniture, which could clash with certain decor themes.
- Maintenance requirements might be higher, especially for moving parts like folding mechanisms.
How to Implement
- Assess your living room's needs: Identify primary activities (e.g., seating, storage, sleeping) to choose the right multifunctional pieces. Measure the available space to ensure a proper fit.
- Research and select furniture: Look for items like nesting tables, wall beds, or convertible sofas from reputable brands. Consider materials, weight capacity, and user reviews for longevity.
- Plan the layout: Arrange furniture to optimize flow and functionality. For instance, place a storage ottoman near seating areas for easy access, or position a sofa bed against a wall to save center space.
- Incorporate complementary storage: Use baskets or shelves alongside multifunctional furniture to organize smaller items, ensuring a cohesive look.
- Maintain regularly: Clean hinges and mechanisms, avoid overloading storage compartments, and follow manufacturer guidelines to extend furniture life.
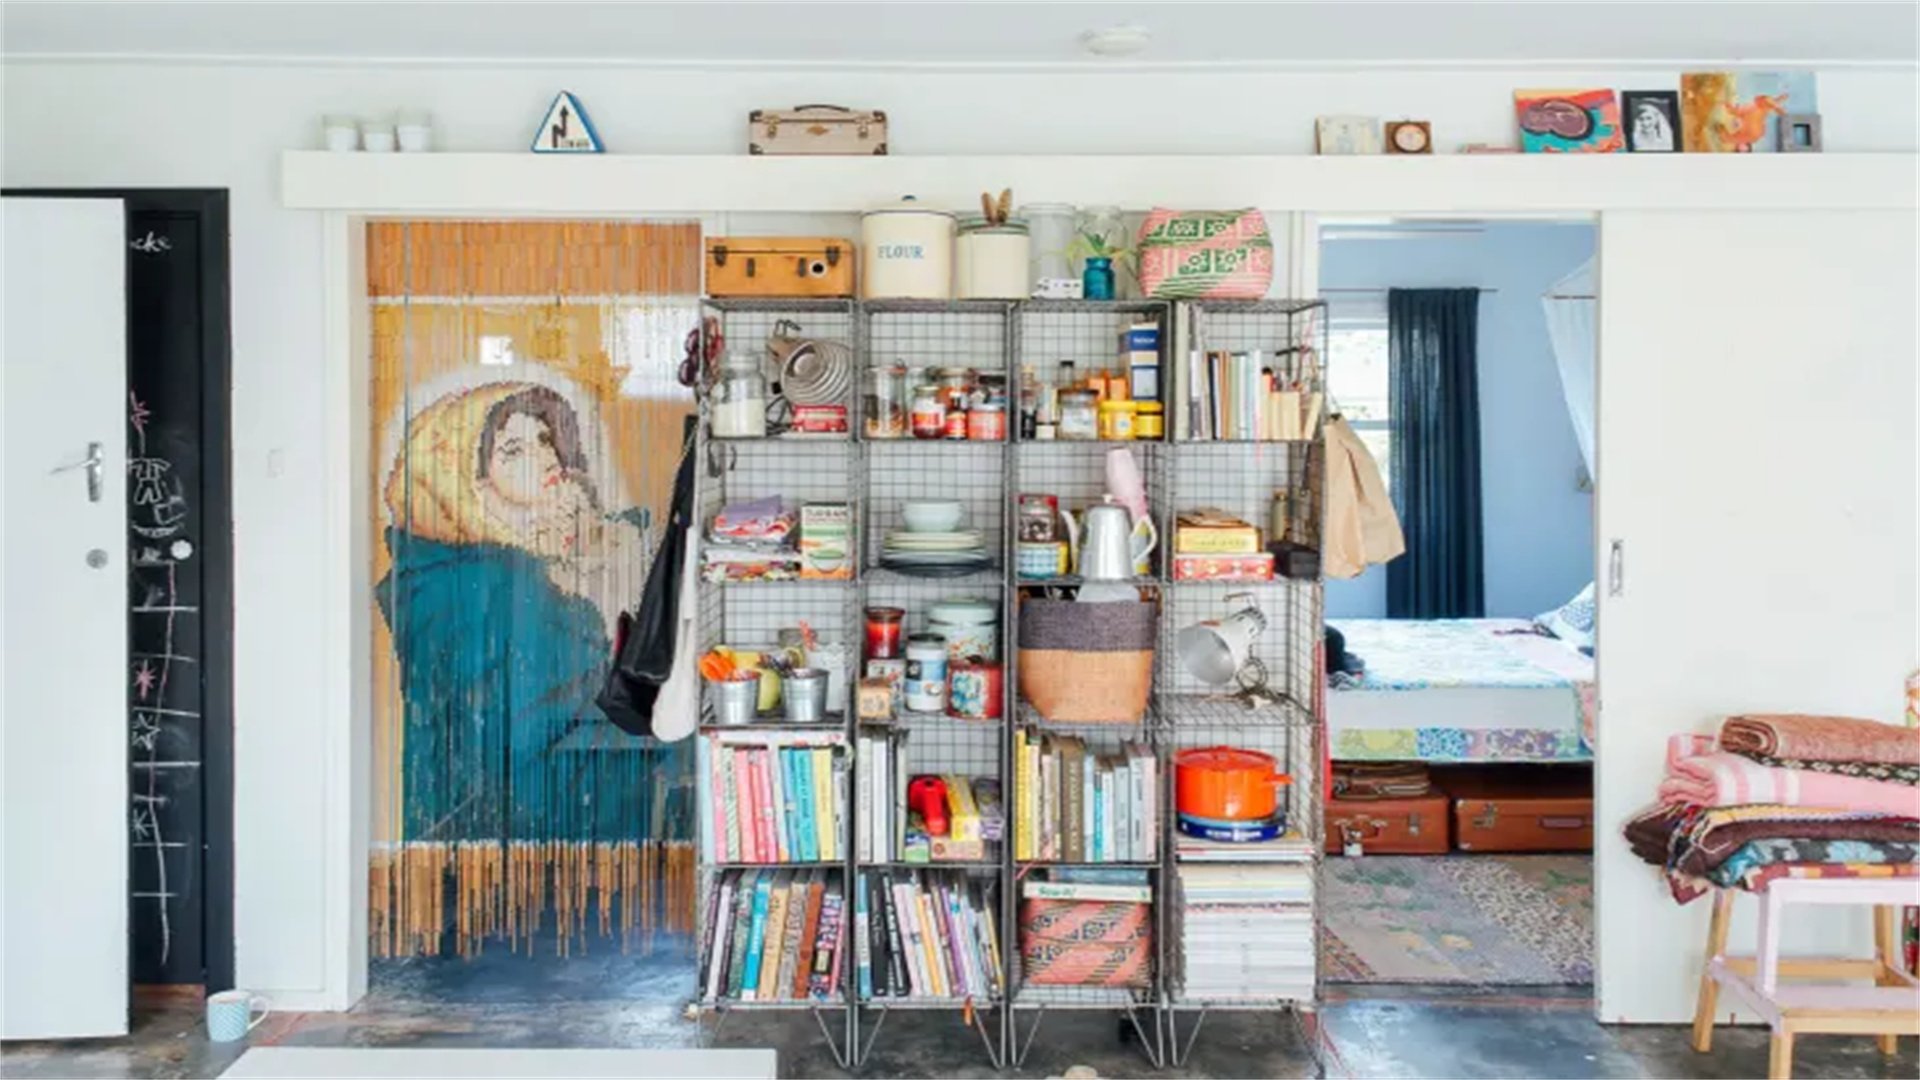
📐 Method Two: Vertical Storage Solutions
Vertical storage involves using wall space for shelves, racks, or hanging systems to free up floor area. This idea is perfect for displaying decor or storing essentials without encroaching on living space.
Advantages
- Utilizes often-wasted wall space, making rooms feel larger and more open.
- Provides easy access to frequently used items, improving daily convenience and organization.
- Allows for customizable arrangements; shelves can be adjusted or added as needs change.
- Enhances visual interest by creating focal points with decorative displays or books.
- Generally cost-effective, as basic shelving units are affordable and DIY-friendly.
Disadvantages
- Installation may require drilling into walls, which can be challenging for renters or those with limited tools.
- Overloading shelves can lead to safety hazards like collapses or damage to walls.
- May collect dust easily, requiring regular cleaning to maintain hygiene and appearance.
- Can make a room feel cluttered if not styled properly, especially in small spaces.
- Limited weight capacity compared to floor-based storage, restricting heavy item storage.
How to Implement
- Evaluate wall space: Identify blank walls or corners in the living room. Consider factors like sunlight, humidity, and proximity to seating areas for practical placement.
- Choose storage types: Opt for floating shelves, ladder shelves, or pegboards based on your style and storage needs. Ensure materials match your decor—for example, wood for a rustic look or metal for industrial vibes.
- Install securely: Use appropriate anchors and brackets for wall type (e.g., drywall or brick). Follow installation guides carefully, or hire a professional if unsure.
- Organize items: Arrange books, plants, or media equipment on shelves, using bins or boxes for smaller items to prevent clutter. Rotate displays seasonally to keep the space fresh.
- Maintain safety: Regularly check for loose screws or sagging shelves. Avoid placing heavy objects on high shelves to prevent accidents.
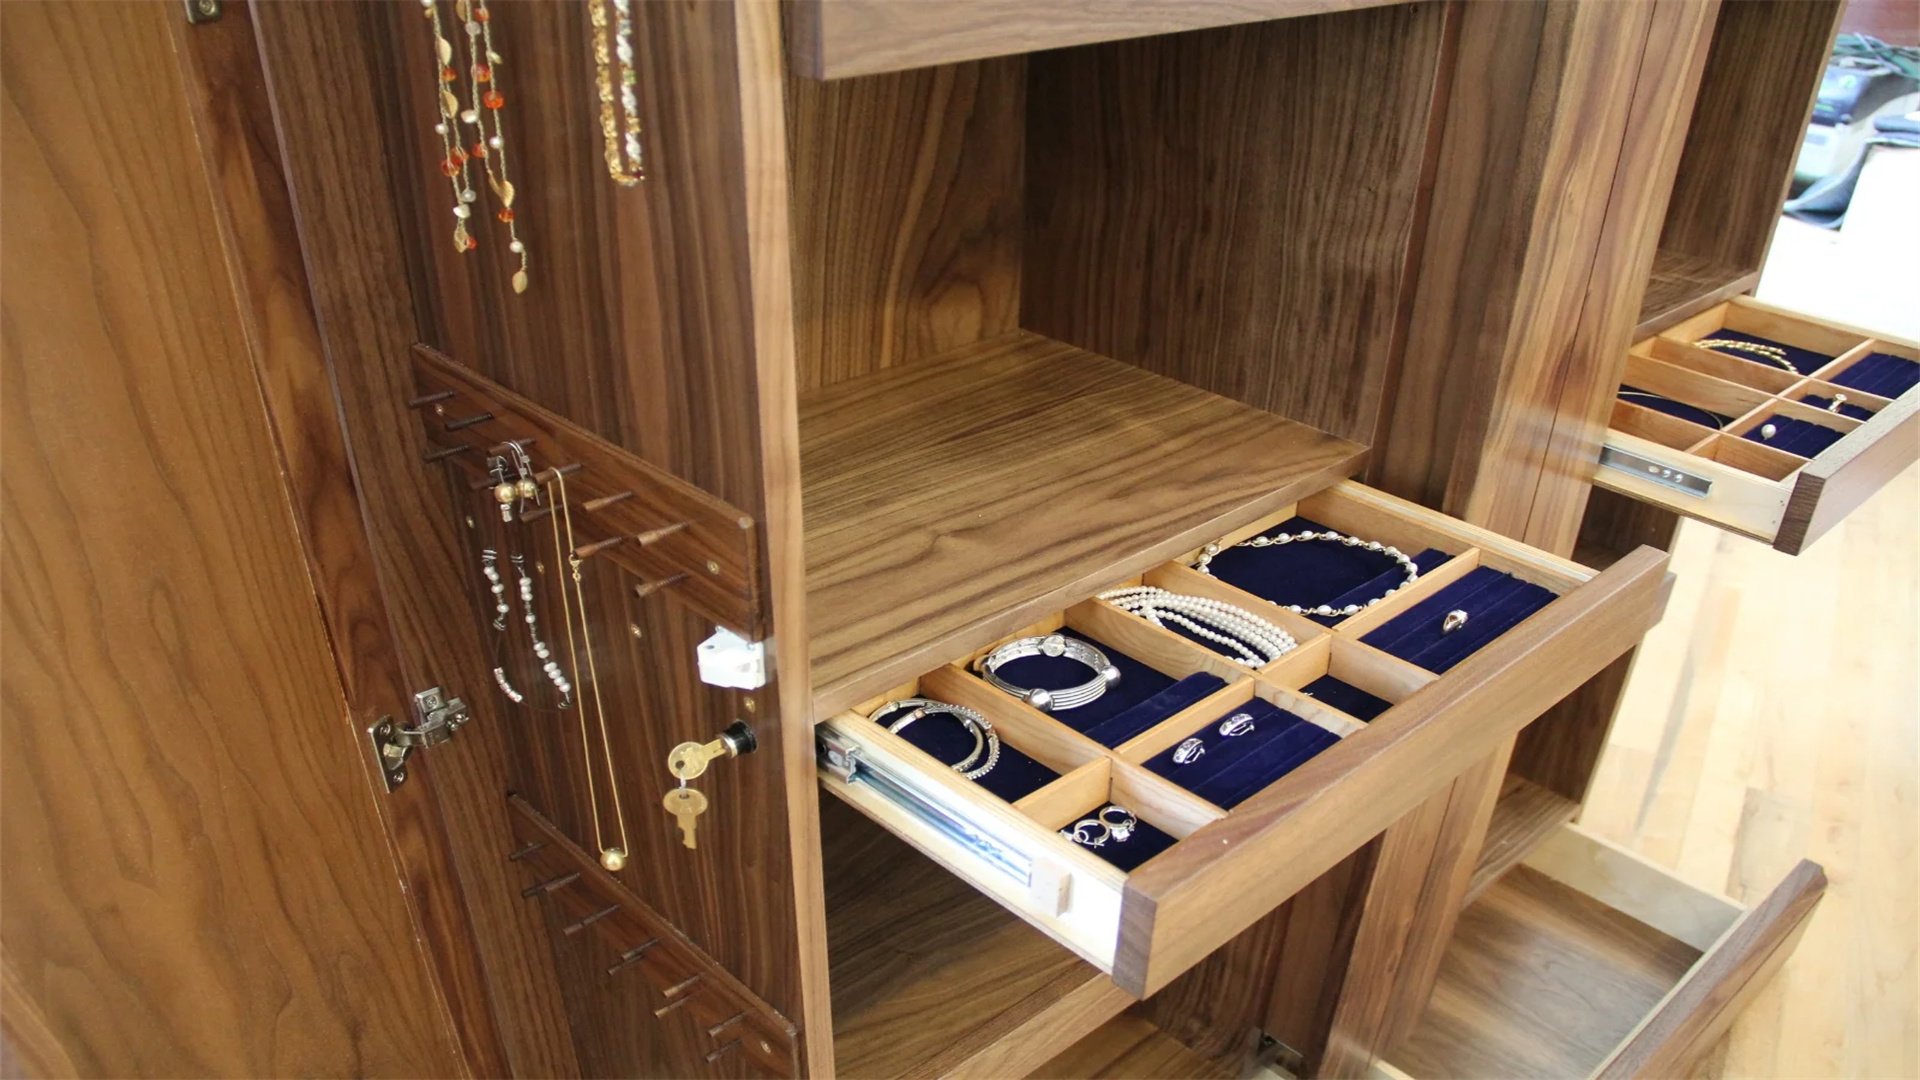
🕵️ Method Three: Hidden Storage Compartments
Hidden storage involves integrating discreet compartments into furniture or architecture, such as under-seat storage or behind-mirror cabinets. This approach keeps items out of sight, promoting a minimalist aesthetic.
Advantages
- Maintains a clean, uncluttered look by concealing belongings, which can reduce stress and enhance relaxation.
- Maximizes unused spaces, like under stairs or within window seats, adding functionality without visual impact.
- Improves security for valuables, as hidden compartments are less obvious to visitors or intruders.
- Can be customized to fit specific items, such as media cables or board games, for efficient organization.
- Adds an element of surprise and creativity to home design, making spaces more engaging.
Disadvantages
- Often requires custom carpentry or renovation, which can be expensive and time-consuming.
- Accessibility might be limited; for example, under-floor storage may be difficult to reach frequently.
- May reduce structural integrity if not installed properly, especially in load-bearing areas.
- Can lead to out-of-sight, out-of-mind issues, causing forgotten items or disorganization over time.
- Not suitable for all homes; renters or those in apartments may face restrictions on modifications.
How to Implement
- Identify hidden spaces: Look for underutilized areas in your living room, such as under sofas, behind walls, or within built-in features. Sketch a plan to visualize potential compartments.
- Select compartment types: Choose from options like lift-top coffee tables, hollow benches, or false walls. Consider DIY kits for simpler projects or hire a contractor for complex builds.
- Construct or install: Use durable materials like plywood or MDF for building compartments. Ensure hinges and locks are sturdy for safety and ease of use. For rental-friendly ideas, use removable panels or fabric covers.
- Organize contents: Label stored items and use dividers to keep compartments tidy. Prioritize seasonal or rarely used items for hidden storage to minimize frequent access.
- Test and maintain: Regularly open compartments to air them out and check for pests or moisture. Lubricate moving parts to ensure smooth operation.
🛏️ Bedroom: A Sanctuary of Rest and Organization
The bedroom should be a peaceful retreat, but limited space can lead to clutter. Here, we explore three space-saving methods to optimize sleeping areas, focusing on practicality and comfort.
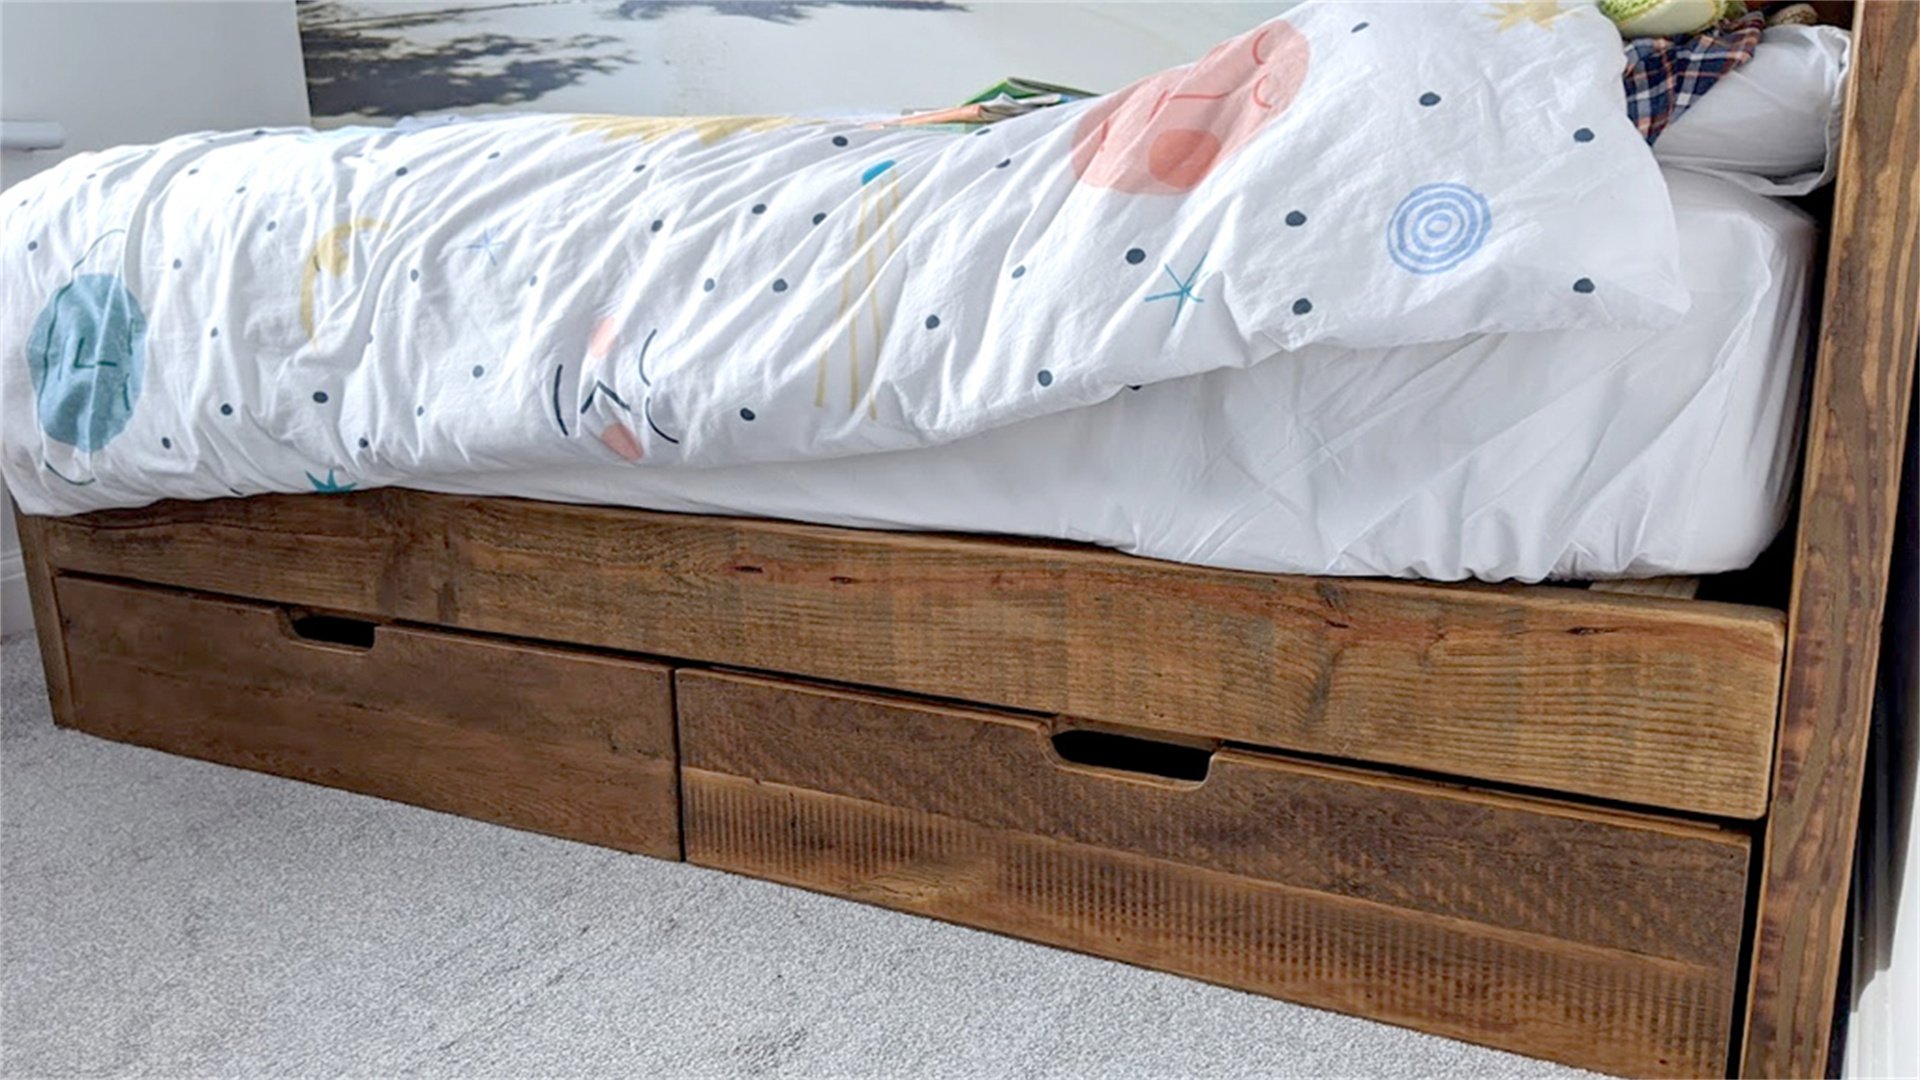
📦 Method One: Under-Bed Storage
Under-bed storage uses the space beneath beds for containers, drawers, or built-in units. This idea is a classic yet effective way to stash items like clothing, linens, or shoes without adding furniture.
Advantages
- Utilizes dead space that is often ignored, significantly increasing storage capacity in small bedrooms.
- Keeps items easily accessible yet out of sight, contributing to a serene bedroom environment.
- Cost-effective, as basic storage bins are affordable and can be reused or rearranged as needed.
- Reduces the need for bulky dressers or wardrobes, freeing up floor space for movement or decor.
- Versatile; can be adapted for seasonal storage, such as winter blankets or summer clothes.
Disadvantages
- May attract dust and allergens under the bed, requiring regular cleaning to maintain air quality.
- Containers can be difficult to pull out if the bed is low or heavy, leading to accessibility issues.
- Overstuffing can strain bed frames or make it hard to slide containers, potentially damaging floors.
- Not ideal for heavy items, as lifting containers might be cumbersome or unsafe.
- Can create a cluttered feel if containers are visible or mismatched, disrupting bedroom aesthetics.
How to Implement
- Measure the under-bed space: Determine the height, width, and depth available. Choose storage solutions that fit snugly, such as low-profile bins or custom drawers.
- Select storage containers: Opt for breathable fabric bins for clothing, plastic boxes for seasonal items, or wheeled drawers for easy access. Consider transparent lids for visibility or opaque ones for a neat look.
- Organize items: Categorize stored belongings—for example, use separate bins for shoes, accessories, or extra bedding. Label containers to quickly find what you need.
- Maintain regularly: Vacuum under the bed monthly to prevent dust buildup. Rotate stored items seasonally to keep contents relevant and organized.
- Enhance accessibility: Use bed risers to increase under-bed clearance if needed, or install pull-out rails for drawers to simplify access.
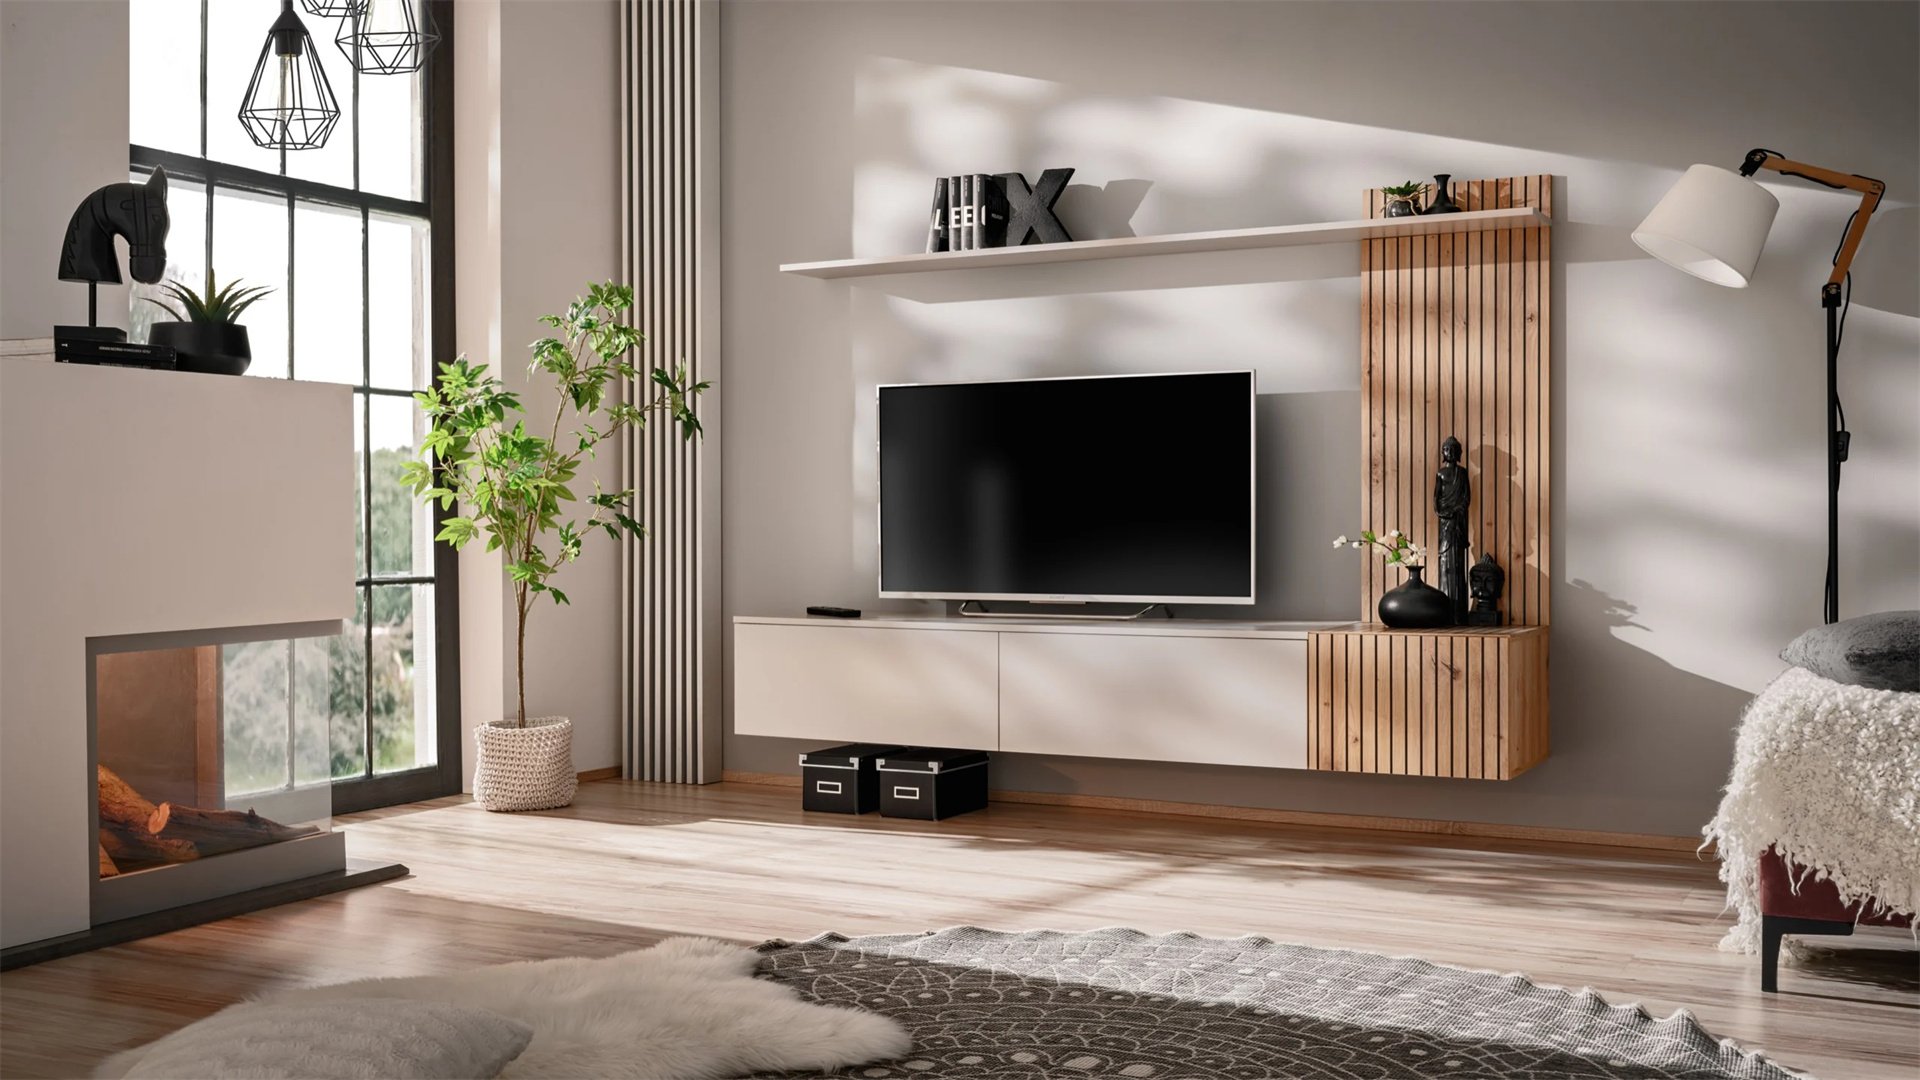
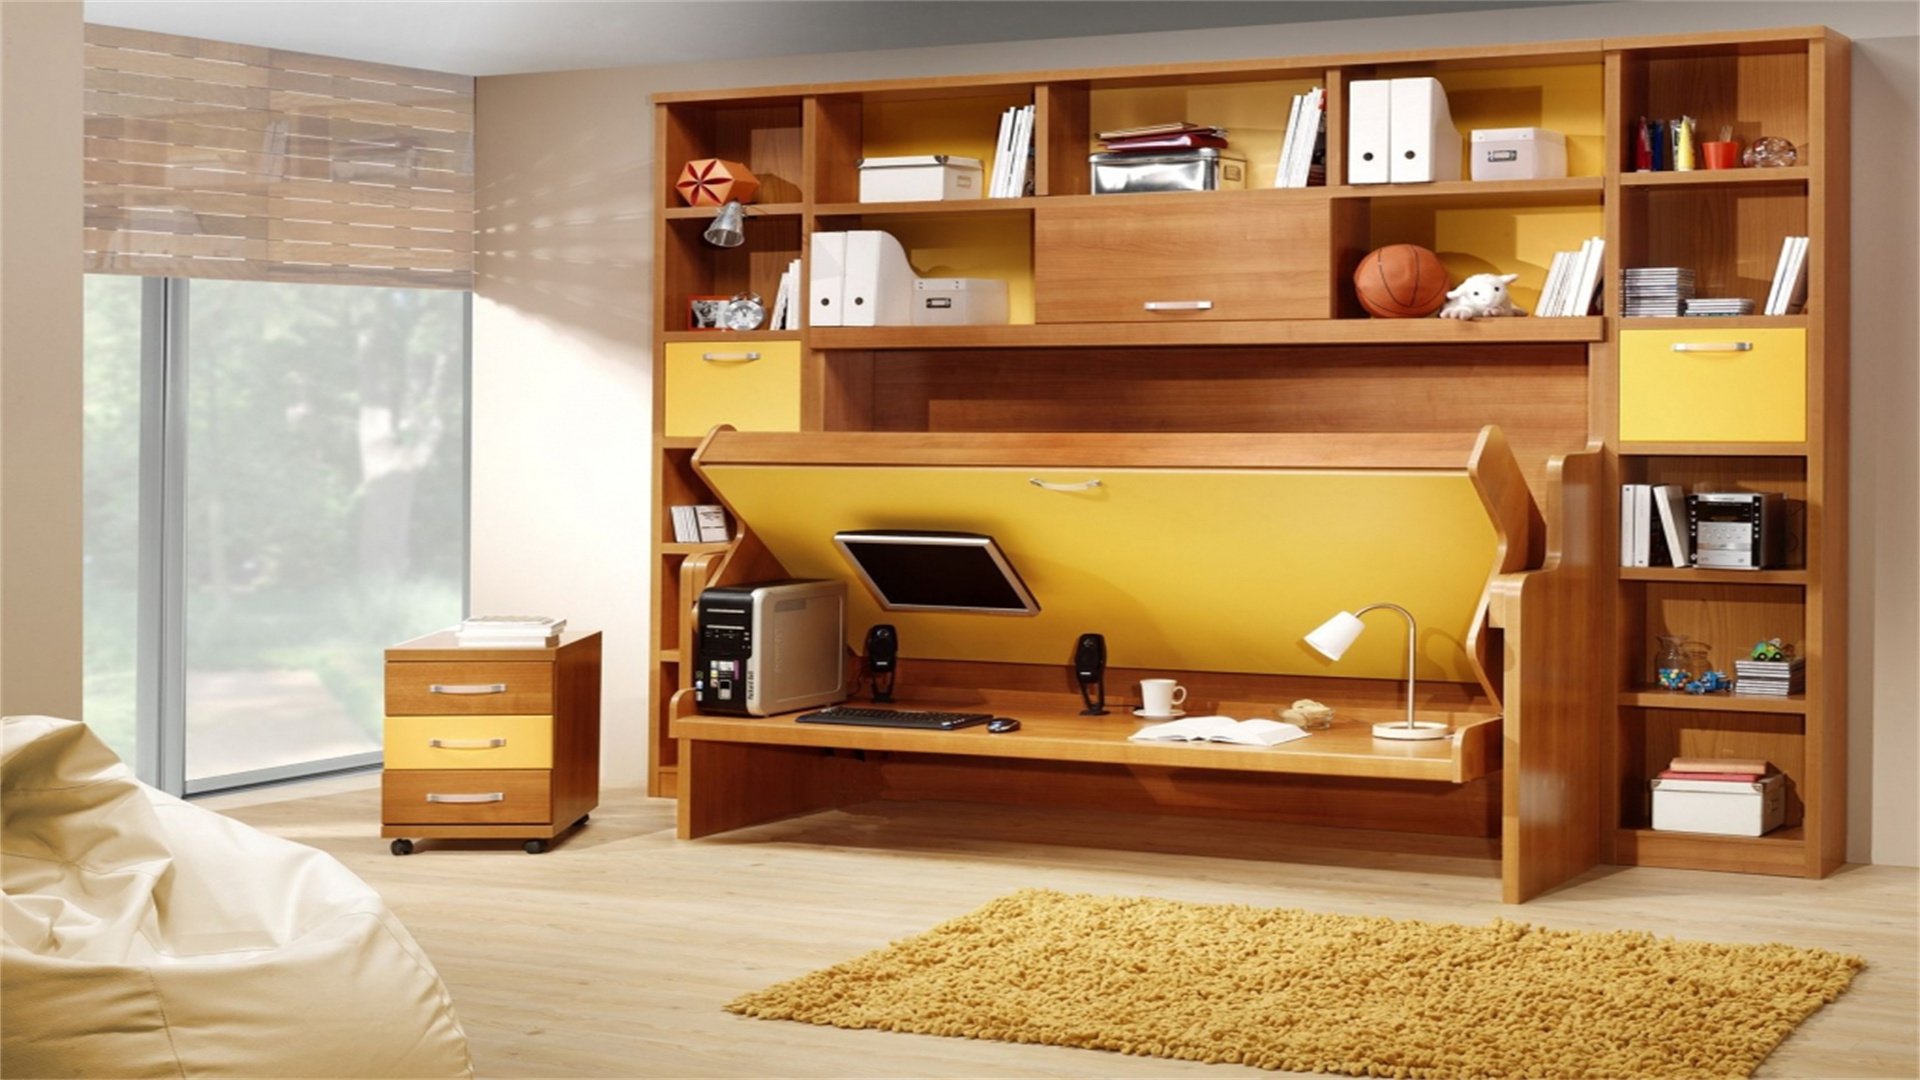
🛠️ Method Two: Wall-Mounted Furniture
Wall-mounted furniture, such as floating nightstands or fold-down desks, attaches directly to walls, eliminating floor contact. This method is ideal for tiny bedrooms where every inch counts.
Advantages
- Frees up floor space, making the room appear larger and easier to clean.
- Offers a modern, sleek look that can elevate bedroom design and reduce visual bulk.
- Customizable in height and placement, accommodating different user needs, like adjustable shelves for children.
- Reduces clutter by providing designated spots for essentials without adding freestanding furniture.
- Often includes hidden features, such as built-in lighting or charging ports, enhancing functionality.
Disadvantages
- Installation requires drilling into walls, which may not be feasible for renters or those with weak wall structures.
- Weight capacity is limited compared to floor-based furniture, restricting heavy item storage.
- Can be more expensive due to mounting hardware and specialized designs.
- Mobility is reduced; once installed, repositioning requires re-drilling and patching holes.
- May feel less sturdy if not properly anchored, posing safety risks for items like TVs or books.
How to Implement
- Plan the layout: Decide where to mount furniture based on bedroom activities. For example, place floating nightstands near the bed for convenience, or install a wall-mounted desk by a window for natural light.
- Choose appropriate pieces: Select furniture designed for wall mounting, such as bracket shelves or fold-out tables. Ensure materials are lightweight yet durable, like engineered wood or metal.
- Install securely: Locate wall studs for optimal support. Use heavy-duty anchors and follow manufacturer instructions. If unsure, consult a professional to avoid damage or accidents.
- Style and organize: Decorate mounted surfaces with lamps, books, or decor to personalize the space. Use hooks or small containers on walls to keep items like jewelry or chargers tidy.
- Perform routine checks: Tighten screws periodically and inspect for signs of wear. Avoid overloading shelves to maintain safety and longevity.
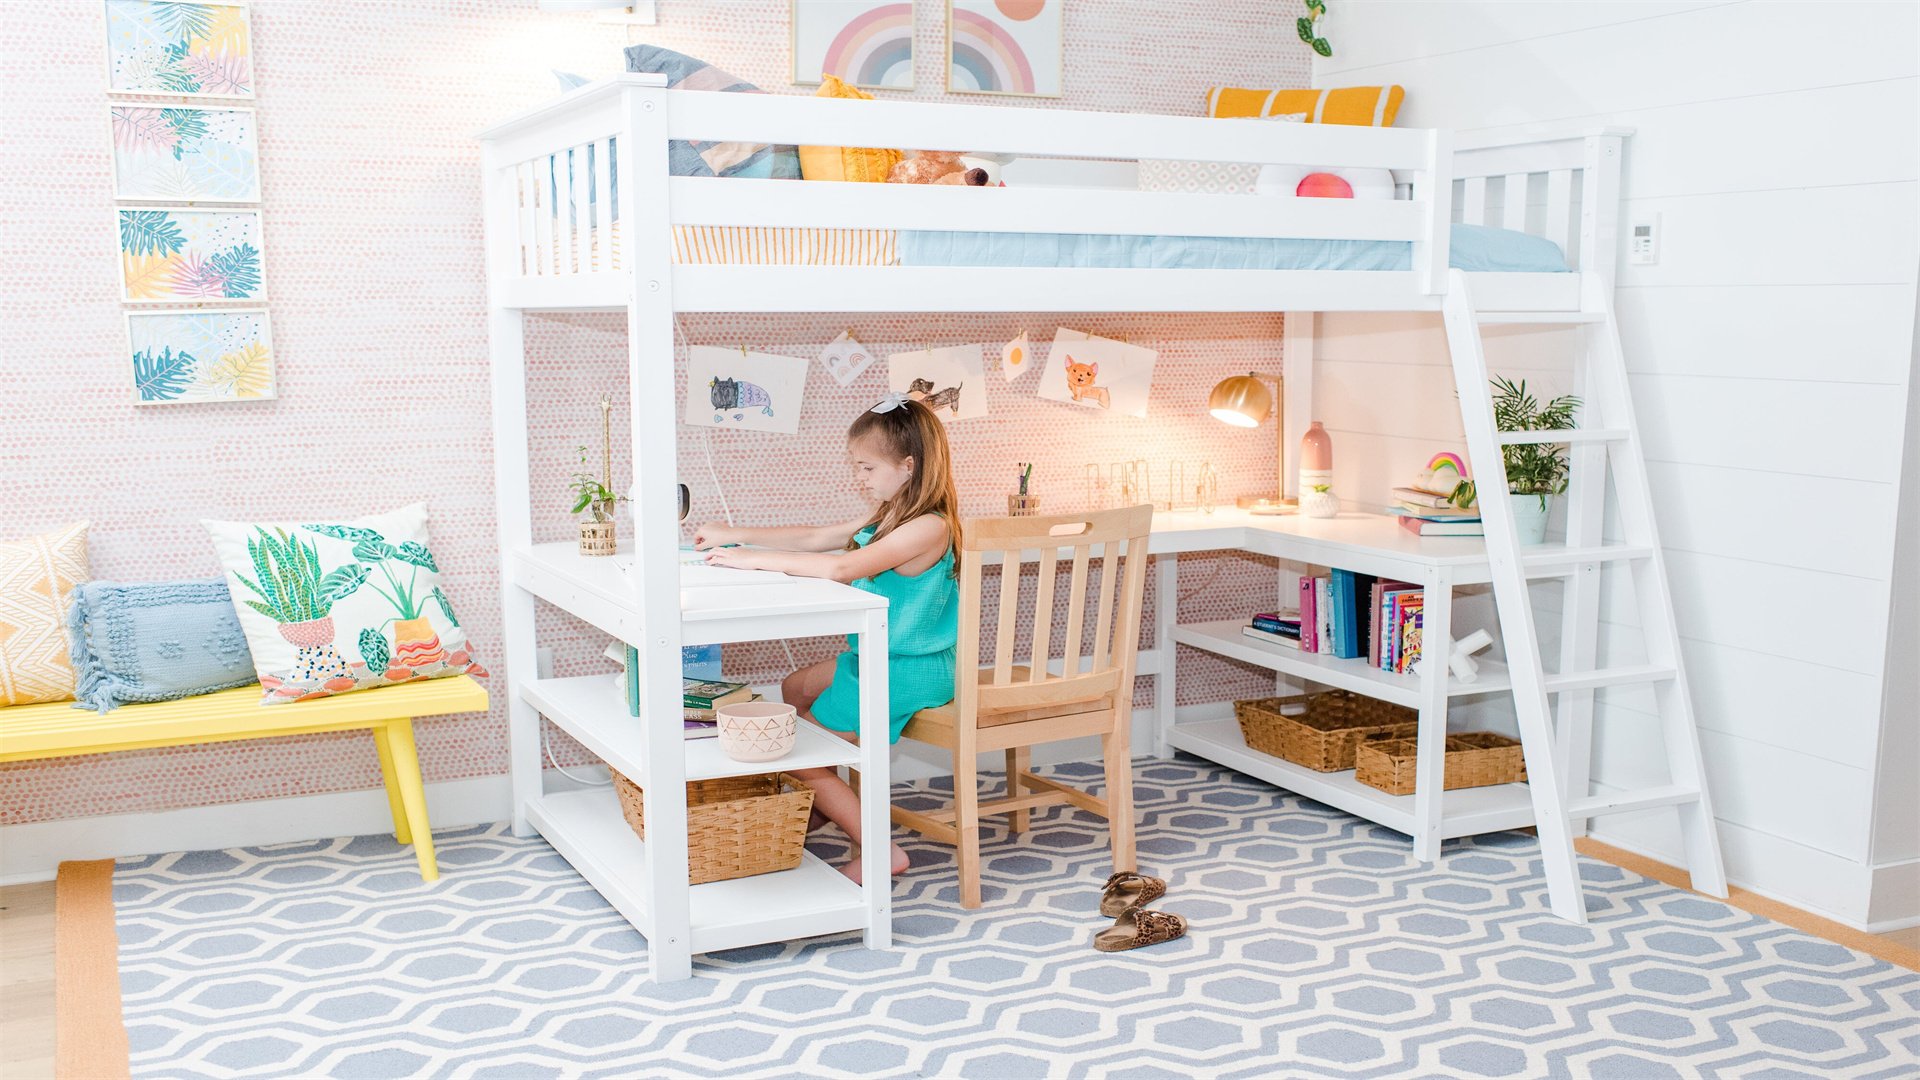
🛏️ Method Three: Loft Beds or Bunk Beds
Loft beds or bunk beds elevate sleeping areas to create usable space underneath, such as for a study or storage. This idea is perfect for children's rooms or studio apartments.
Advantages
- Doubles floor space by utilizing vertical height, allowing for multiple functions in one room.
- Encourages creative use of under-bed areas—for example, for a cozy reading nook or compact workspace.
- Ideal for shared bedrooms, as bunk beds can accommodate multiple sleepers without expanding footprint.
- Adds a fun, adventurous element to room design, especially for kids or teens.
- Can incorporate built-in features like desks or drawers, further optimizing space.
Disadvantages
- Safety concerns with heights, particularly for young children or elderly users, requiring guardrails and secure ladders.
- Installation can be complex and time-consuming, often requiring assembly by two or more people.
- May feel cramped or claustrophobic for the lower bunk, especially in low-ceilinged rooms.
- Limited accessibility; climbing up and down can be inconvenient for daily use or those with mobility issues.
- Can dominate room aesthetics, making it hard to decorate around or change themes easily.
How to Implement
- Assess room dimensions: Measure ceiling height and floor space to ensure the bed fits safely. Allow at least 30 inches of clearance above the top bunk for comfort and safety.
- Select a bed design: Choose from standard bunk beds, loft beds with desks, or customizable kits. Look for safety certifications and sturdy materials like solid wood or steel.
- Prepare the area: Clear the room for assembly. Ensure the floor is level and walls are free of obstructions. Consider anchoring the bed to walls for added stability.
- Assemble and secure: Follow instruction manuals carefully, tightening all bolts and installing guardrails. Test the structure for wobbles before use.
- Optimize under-bed space: Furnish the area with a small desk, storage units, or seating to maximize functionality. Use soft lighting and rugs to create a inviting atmosphere.
🍳 Kitchen: Efficient Cooking and Storage Hub
Kitchens often accumulate clutter from appliances and groceries. These space-saving ideas focus on optimizing countertops, cabinets, and corners for a streamlined cooking experience.
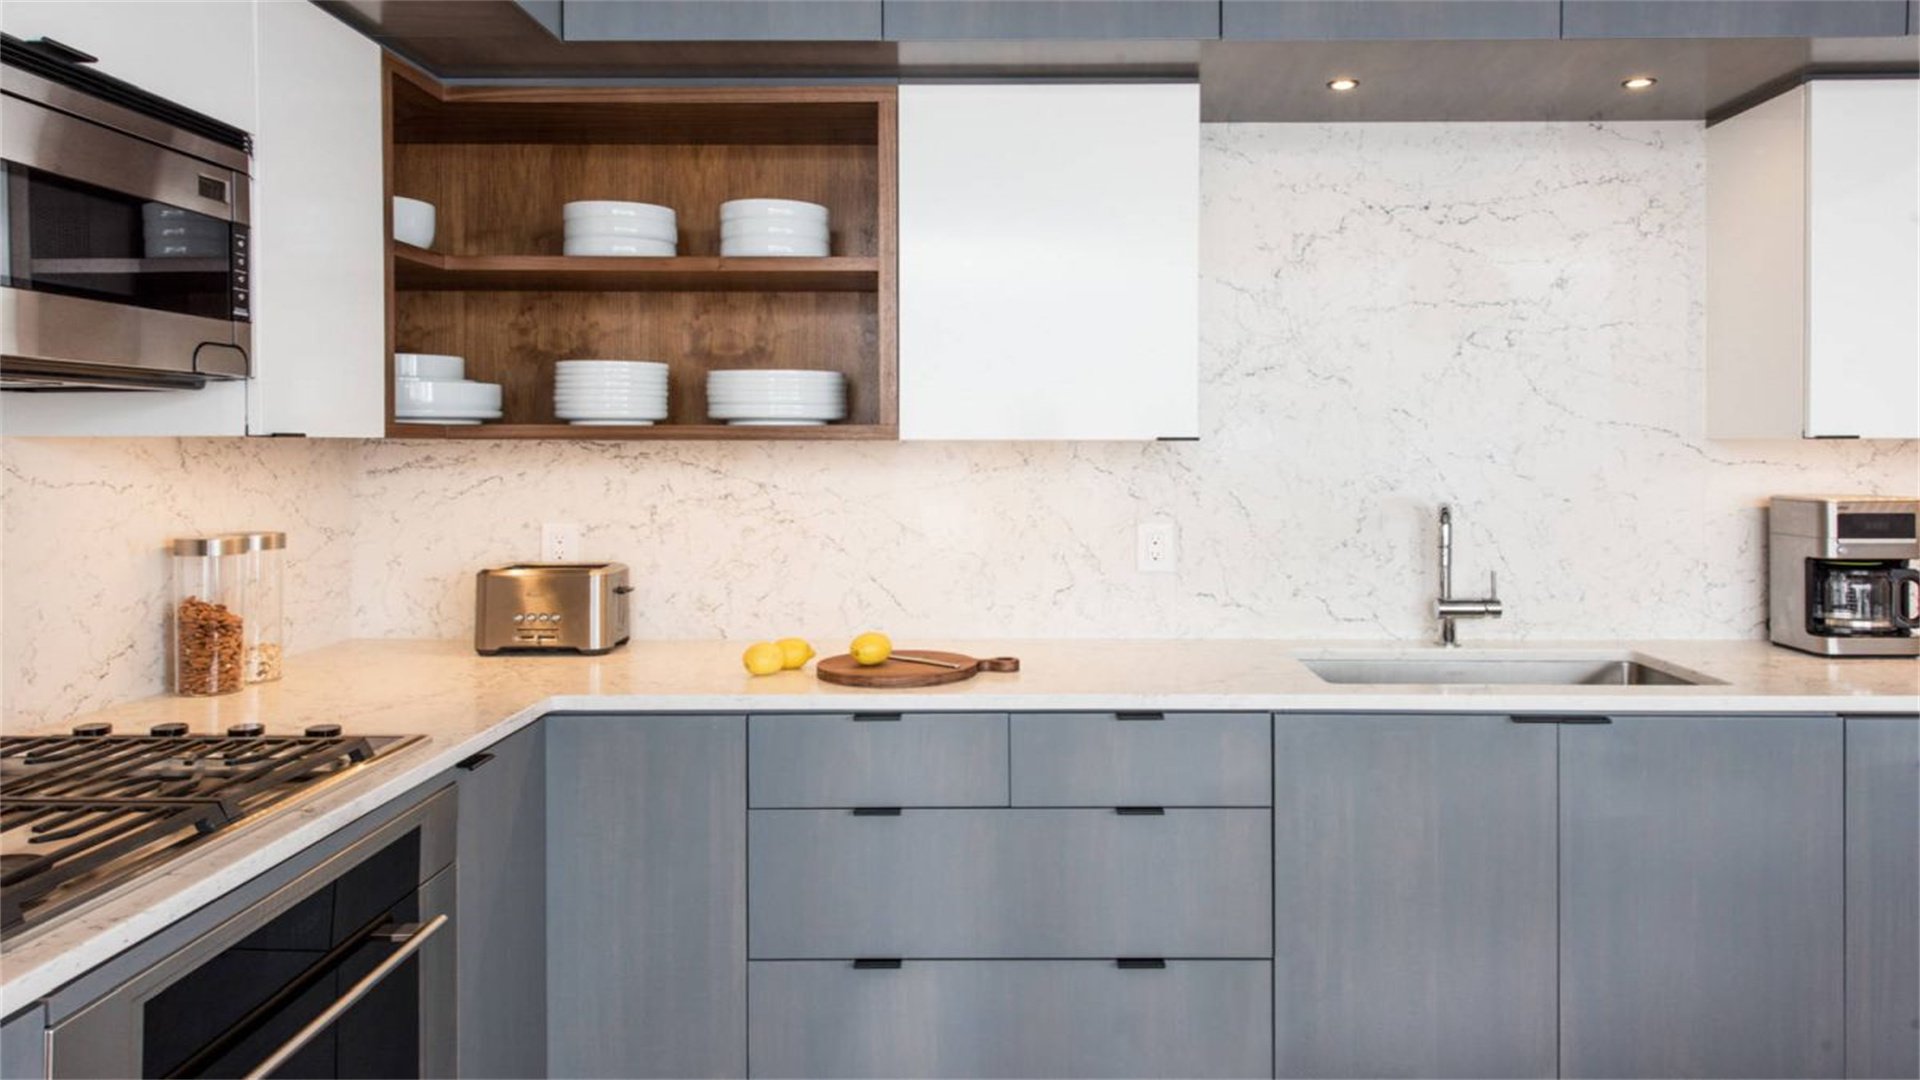
🗄️ Method One: Overhead and Corner Cabinets
Overhead and corner cabinets use vertical space for storage, often with pull-out shelves or lazy Susans to access hard-to-reach areas. This method is essential for keeping countertops clear.
Advantages
- Maximizes storage in small kitchens by utilizing upper wall space, freeing up lower areas for movement.
- Keeps dangerous or fragile items out of reach of children, enhancing safety.
- Can be customized with organizers like tiered shelves or door racks for efficient item arrangement.
- Improves kitchen aesthetics by hiding clutter behind closed doors, contributing to a clean look.
- Increases property value, as well-designed cabinetry is a key feature in modern homes.
Disadvantages
- High shelves may be difficult to access for shorter individuals, requiring step stools or assistance.
- Corner cabinets can waste space if not equipped with rotating systems, leading to unused areas.
- Installation is often permanent and costly, involving carpentry or renovation work.
- Can make kitchens feel enclosed or dark if cabinets are too bulky or poorly placed.
- Maintenance includes regular cleaning of shelves and hardware to prevent grease buildup or wear.
How to Implement
- Plan cabinet layout: Assess kitchen workflow and storage needs. Design cabinets to hold frequently used items at eye level and lesser-used items higher up.
- Choose cabinet features: Opt for pull-out shelves in corner cabinets, vertical dividers for trays, or overhead racks for pots and pans. Consider soft-close hinges for durability.
- Install or upgrade: Hire a professional for new installations, or retrofit existing cabinets with organizers from brands like IKEA or The Container Store. Ensure measurements are precise to avoid gaps.
- Organize contents: Group items by category—e.g., baking supplies in one cabinet, spices in another. Use clear containers or labels for easy identification.
- Maintain regularly: Wipe down cabinets monthly to remove dust and grease. Check hinges and slides for smooth operation, lubricating as needed.
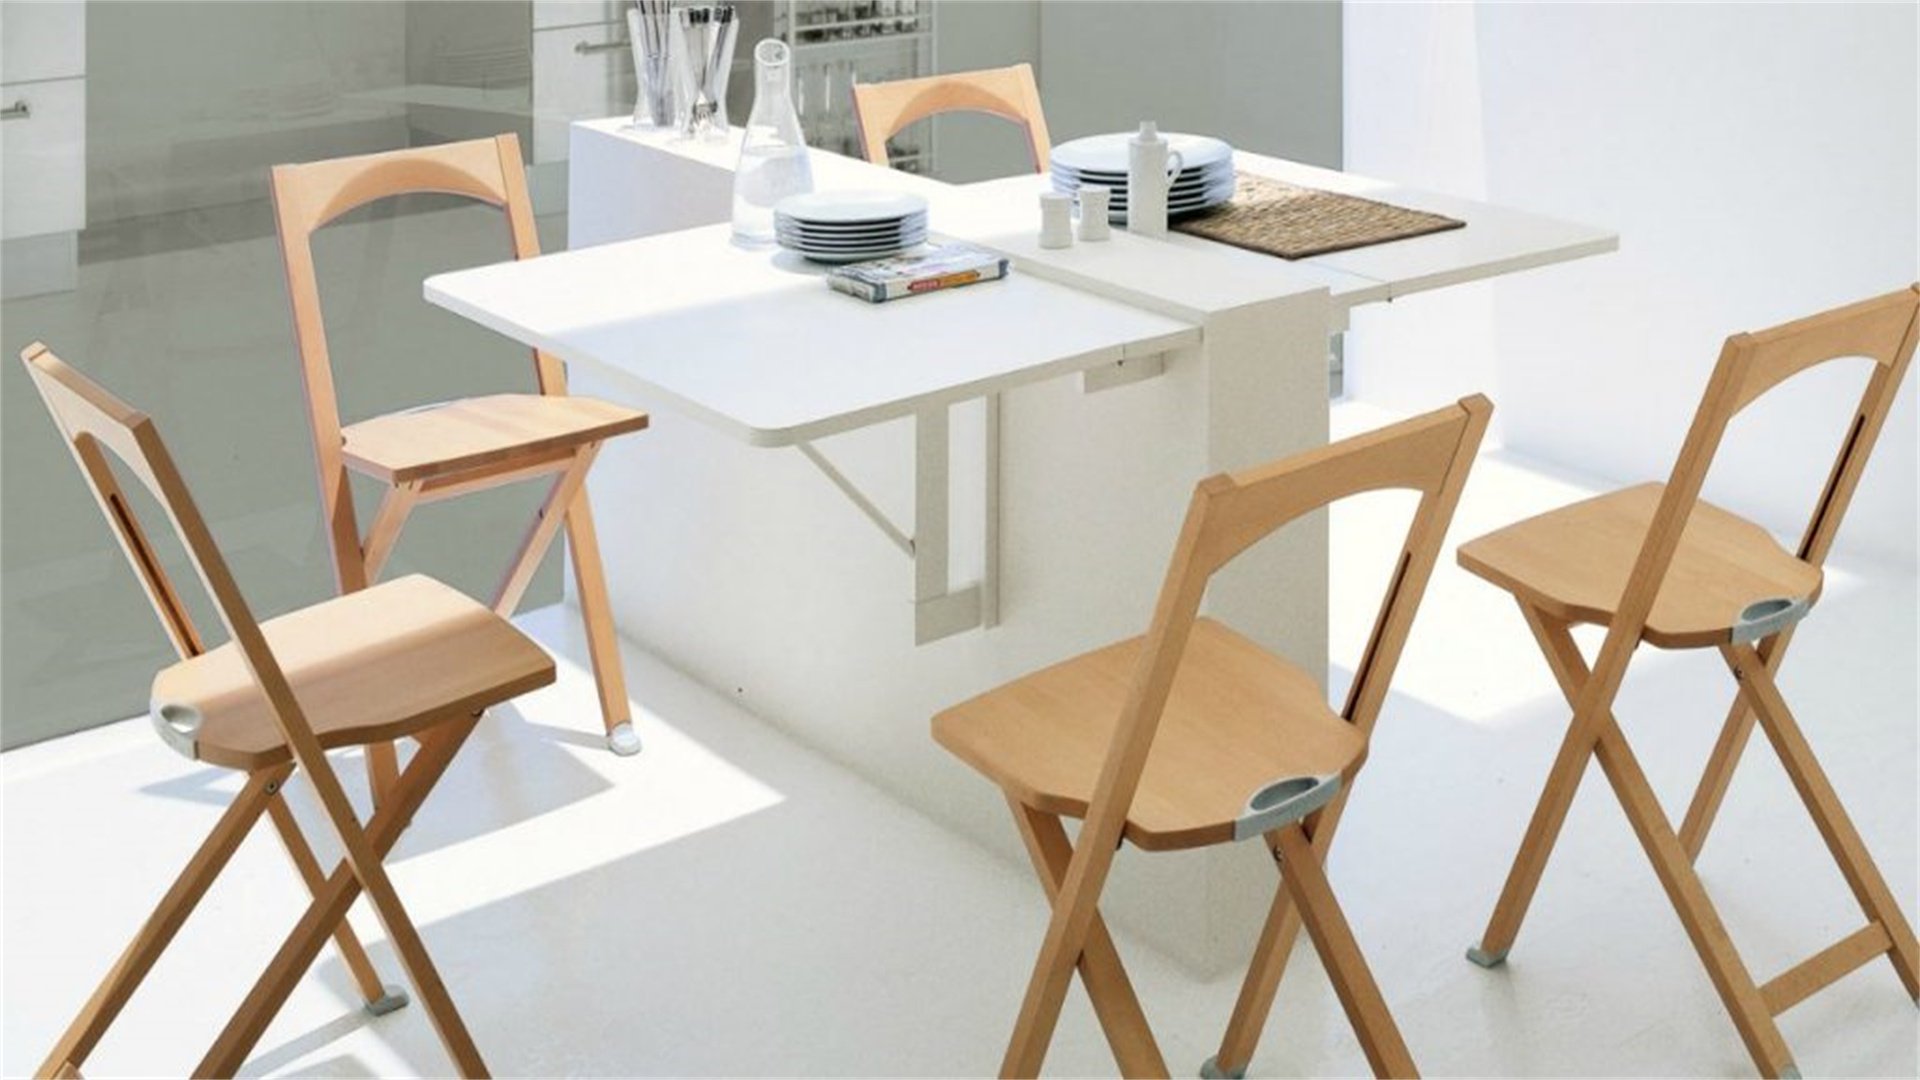
🪑 Method Two: Foldable and Expandable Furniture
Foldable and expandable furniture, such as drop-leaf tables or wall-mounted counters, can be tucked away when not in use. This idea is perfect for kitchens that double as dining or work areas.
Advantages
- Provides flexibility for different activities, like meal prep or entertaining, without permanent space dedication.
- Creates an illusion of more space when folded, making small kitchens feel open and airy.
- Often lightweight and portable, allowing for easy rearrangement or storage in closets.
- Cost-effective compared to built-in solutions, with many affordable options available online.
- Encourages minimalist living by reducing the number of permanent furniture pieces.
Disadvantages
- May lack stability compared to fixed furniture, especially when extended or loaded with heavy items.
- Folding mechanisms can wear out over time, requiring repairs or replacements.
- Limited surface area when folded, which might not suffice for large families or frequent use.
- Aesthetics may be utilitarian, clashing with high-end kitchen designs if not chosen carefully.
- Setup and takedown can be inconvenient for daily use, potentially discouraging utilization.
How to Implement
- Identify needs: Determine how the kitchen will be used—e.g., for quick breakfasts or large dinners—to select appropriate foldable furniture.
- Select pieces: Choose from options like fold-down tables, rolling kitchen islands, or expandable shelves. Prioritize sturdy materials like metal or hardwood for longevity.
- Install or place: Mount foldable tables on walls with secure brackets, or position rolling islands near work areas. Ensure there's clearance for folding and unfolding.
- Incorporate into routine: Use foldable surfaces for specific tasks, such as a prep station during cooking, then fold away to clean. Store chairs or stools nearby for dining.
- Maintain mechanisms: Clean hinges and locks regularly, avoiding moisture exposure. Test stability periodically and tighten screws as needed.

🧲 Method Three: Magnetic and Pegboard Organizers
Magnetic and pegboard organizers use walls to store knives, utensils, or spices, keeping countertops clear. This approach adds a trendy, industrial touch to kitchens.
Advantages
- Frees up drawer and counter space by utilizing vertical surfaces for frequently used items.
- Improves accessibility, as items are visible and within reach, speeding up cooking processes.
- Highly customizable; pegboards can be rearranged with hooks and shelves to suit changing needs.
- Adds a decorative element, with colorful pegs or magnetic strips enhancing kitchen decor.
- Easy to install and remove, making it rental-friendly and adaptable for temporary setups.
Disadvantages
- Can collect dust and grease from cooking, requiring frequent cleaning to maintain hygiene.
- May look cluttered if overfilled, detracting from kitchen aesthetics and causing visual stress.
- Magnetic strips might not hold heavy items securely, posing safety risks for sharp tools.
- Pegboards can damage walls if not mounted properly, leaving holes or stains.
- Limited storage for bulky items, best suited for small utensils or lightweight containers.
How to Implement
- Choose a wall area: Select a spot near the cooking zone, such as above the stove or beside the sink, for easy access. Ensure it's away from heat or water sources to prevent damage.
- Select organizers: Buy magnetic strips for knives and metal tools, or pegboard panels with assorted hooks and baskets. Consider stainless steel for durability or painted boards for style.
- Install securely: Use wall anchors for pegboards, ensuring they're level and firmly attached. For magnetic strips, follow adhesive or screw instructions based on wall type.
- Arrange items: Hang utensils by frequency of use—e.g., keep everyday spatulas at eye level. Use jars or bins on pegboards for spices or dry goods, labeling for clarity.
- Clean regularly: Wipe down organizers weekly with a damp cloth. Check for rust or wear, especially on metal components, and replace as needed.
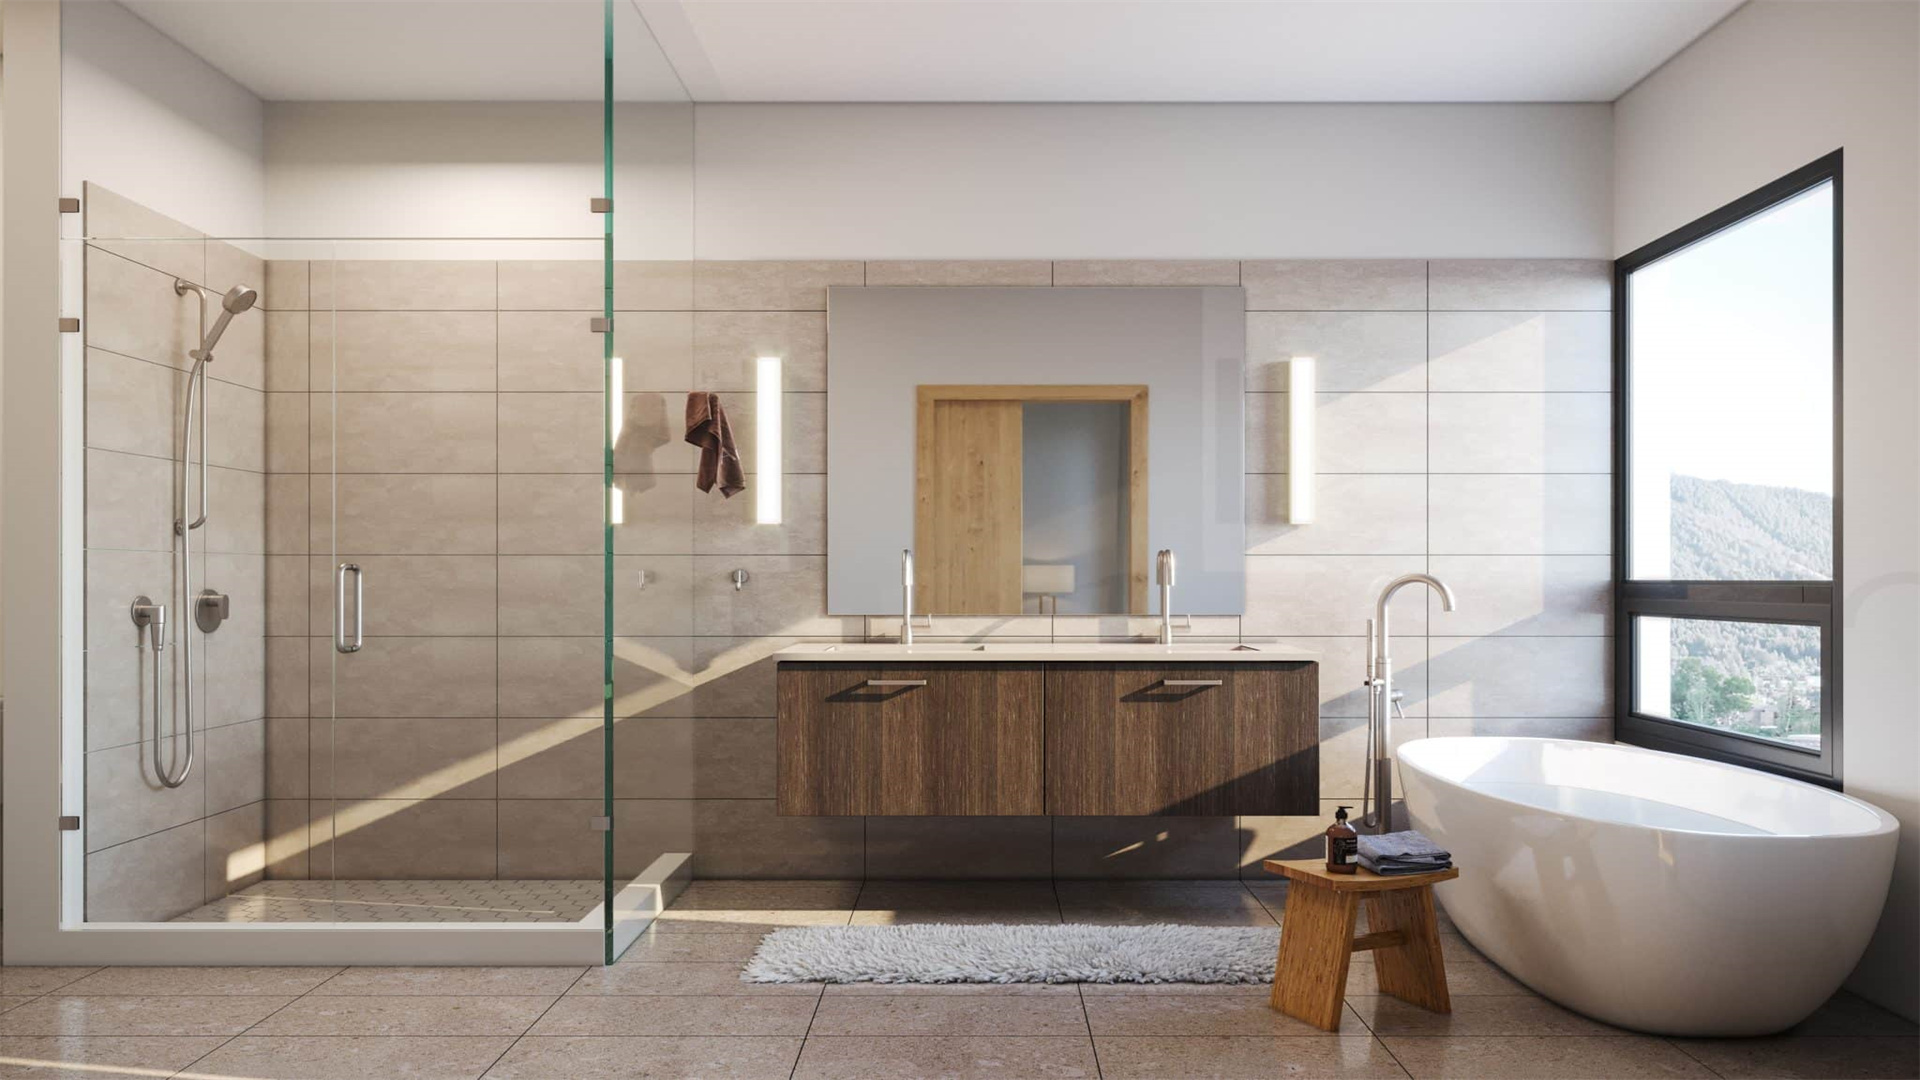
🚿 Bathroom: Compact Hygiene and Storage Solutions
Bathrooms are often the smallest rooms but require storage for toiletries and towels. These ideas focus on optimizing vertical and hidden spaces for a clutter-free environment.
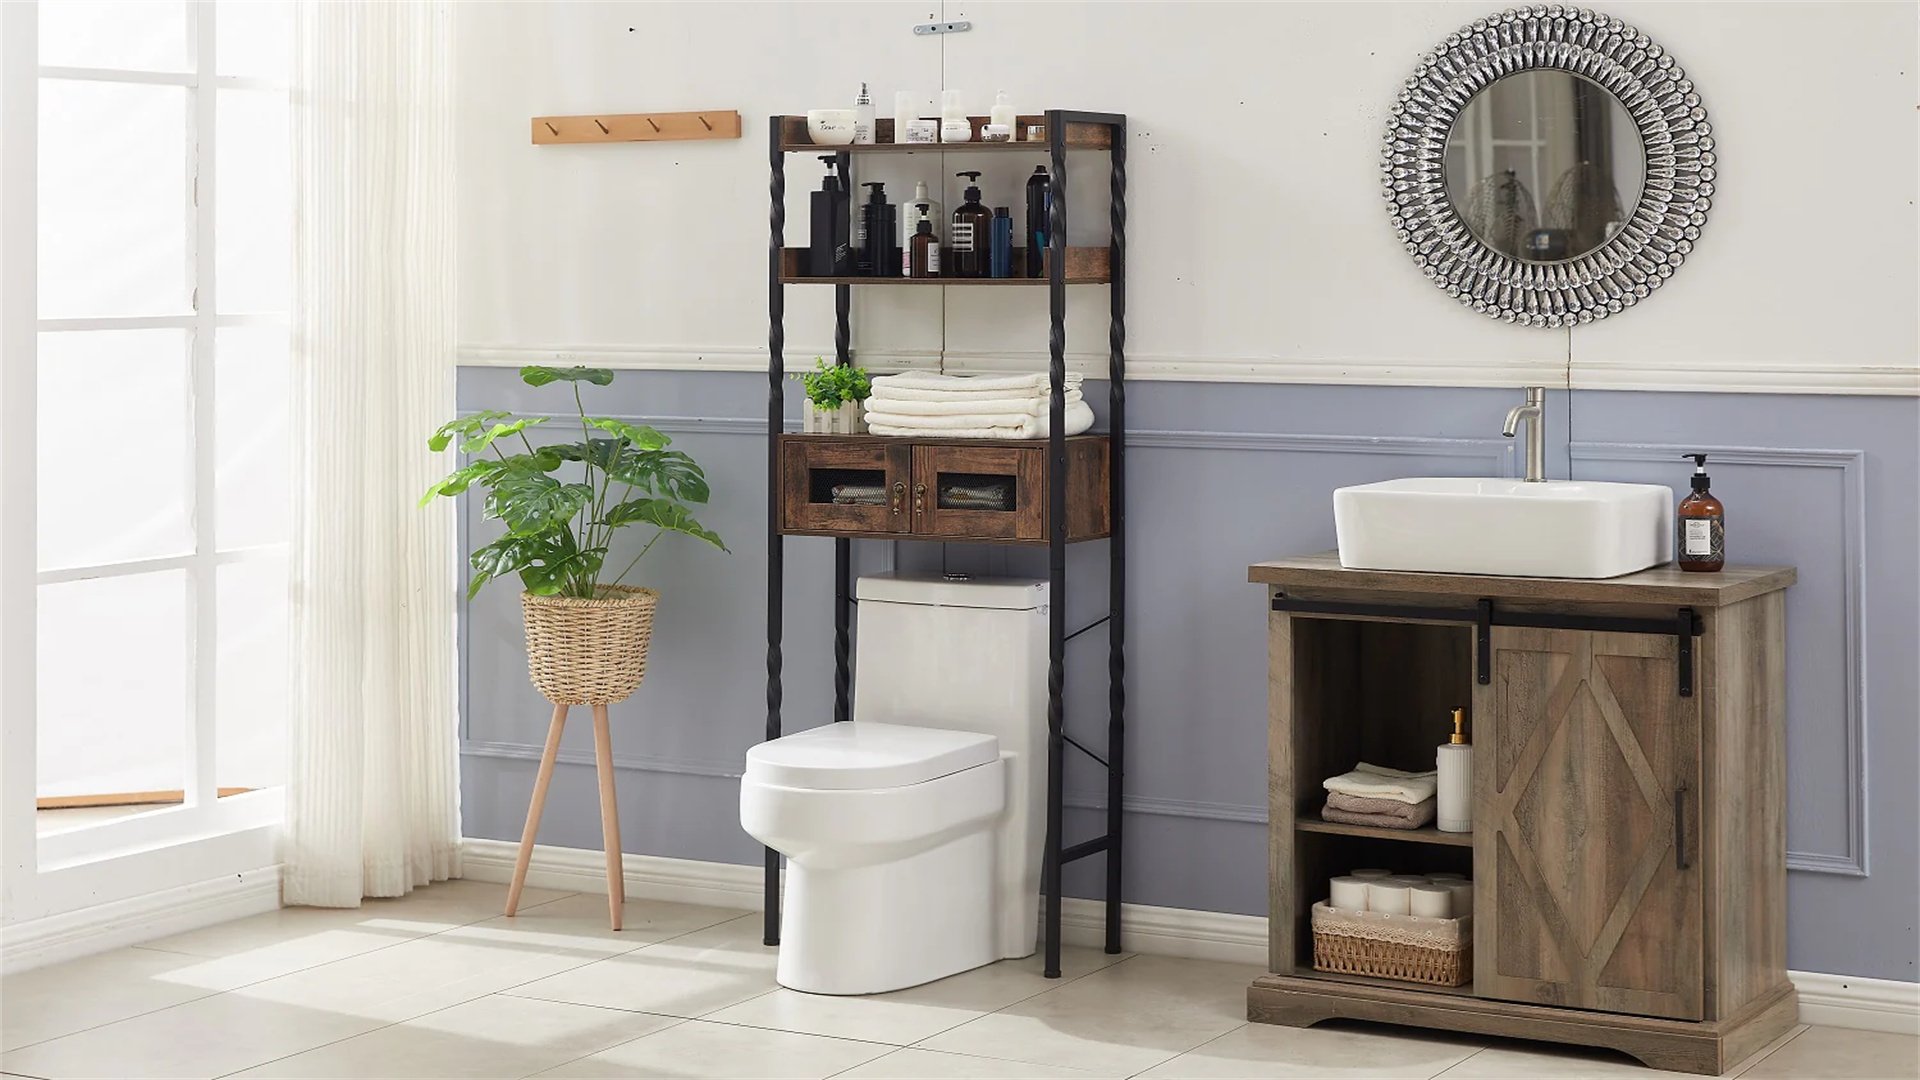
🚽 Method One: Over-Toilet Storage Units
Over-toilet storage units are shelves or cabinets that fit above the toilet tank, using often-wasted vertical space. This method is ideal for storing extra towels, toilet paper, or beauty products.
Advantages
- Utilizes empty space above the toilet, adding storage without occupying floor area.
- Easy to install, with many freestanding units requiring no tools or drilling.
- Provides accessible storage for daily essentials, reducing clutter on countertops or in cabinets.
- Comes in various styles, from modern metal racks to rustic wood shelves, complementing bathroom decor.
- Cost-effective, with affordable options available at home goods stores or online retailers.
Disadvantages
- May obstruct toilet access or cleaning, making maintenance more challenging.
- Freestanding units can tip over if not stable, especially in households with children or pets.
- Limited weight capacity, restricting storage to lightweight items only.
- Can collect moisture and mold in humid bathrooms, requiring regular cleaning and ventilation.
- Might not fit all toilet sizes, necessitating careful measurement before purchase.
How to Implement
- Measure the space: Determine the width, depth, and height above your toilet. Choose a unit that fits snugly without touching the toilet tank or wall.
- Select a storage unit: Opt for freestanding shelves for renters, or wall-mounted cabinets for permanent solutions. Consider materials like bamboo for humidity resistance.
- Install or place: For freestanding units, ensure the floor is level and position it securely. For wall-mounted options, use waterproof anchors and follow installation guides.
- Organize items: Store frequently used items on lower shelves for easy reach. Use baskets or bins to group small products like cosmetics or medications.
- Maintain regularly: Wipe down the unit weekly to prevent dust and mold buildup. Check for stability, especially after cleaning or rearranging items.
🛁 Method Two: Shower Caddies and Niche Shelves
Shower caddies and niche shelves provide storage within showers or bathtubs, keeping toiletries off the floor. This idea enhances bathroom safety and organization.
Advantages
- Keeps shower areas tidy by containing shampoos, soaps, and razors in designated spots.
- Reduces slip hazards by preventing bottles from cluttering the floor, improving safety.
- Easy to install, with many caddies using suction cups or tension rods for rental-friendly setups.
- Maximizes vertical space in showers, especially useful in compact bathrooms with limited shelving.
- Can be stylish, with options like corner caddies or built-in niches adding a spa-like feel.
Disadvantages
- Suction cups may lose grip in humid conditions, causing caddies to fall and potentially break.
- Limited capacity for large items, such as family-sized bottles or multiple products.
- Requires frequent cleaning to prevent soap scum or mildew buildup on shelves and bottles.
- Built-in niches involve renovation work, which can be costly and disruptive.
- Metal caddies can rust over time, especially in areas with hard water or high humidity.
How to Implement
- Assess shower space: Look for unused corners or walls where a caddy or niche could fit. Consider the shower's water flow to avoid blocking spray.
- Choose storage type: Select from hanging caddies, corner shelves, or recessed niches based on your needs and bathroom layout. Opt for rust-resistant materials like plastic or stainless steel.
- Install securely: For caddies, clean the surface before applying suction cups or tension rods. For niches, hire a professional to cut into walls and tile, ensuring waterproofing.
- Organize toiletries: Place frequently used items at eye level and heavier bottles on lower shelves. Use soap dishes or hooks for additional organization.
- Clean and maintain: Rinse caddies weekly to remove soap residue. Check suction cups or mounts for wear, and replace as needed to prevent accidents.
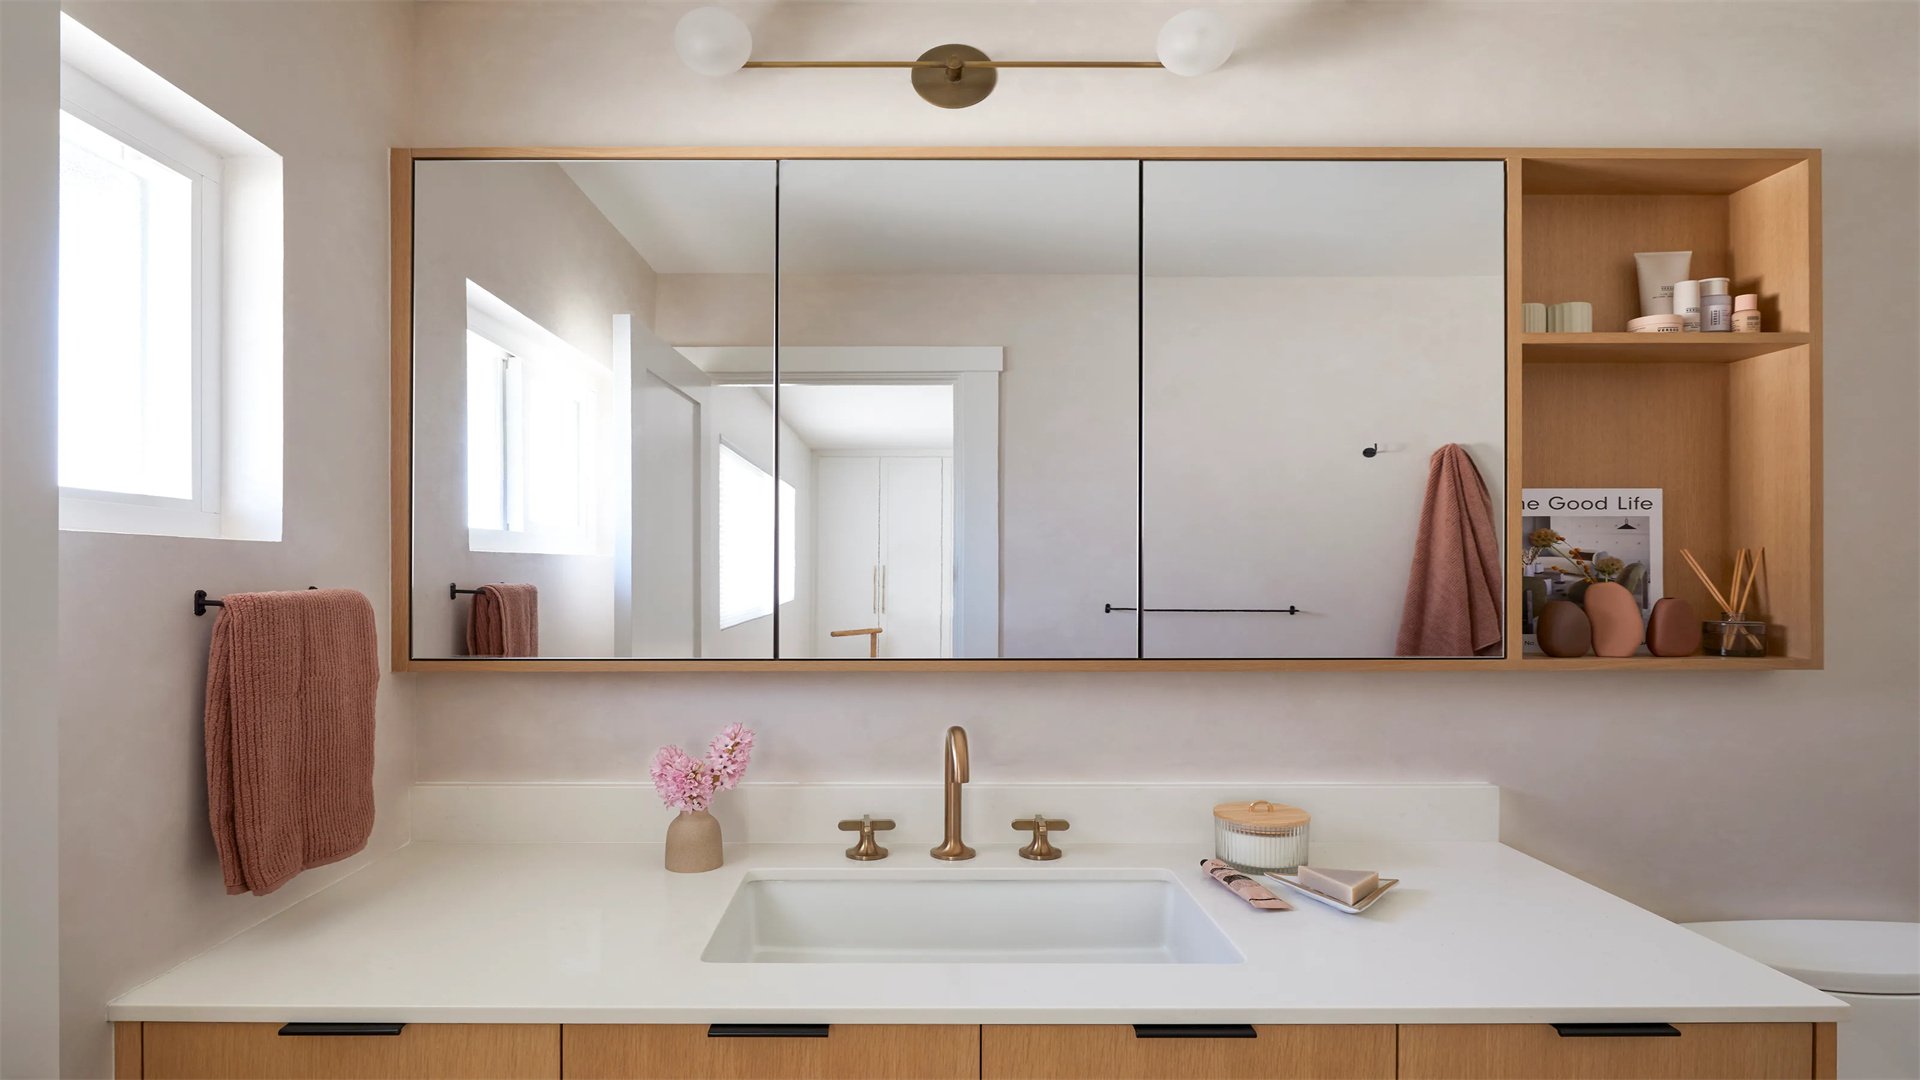
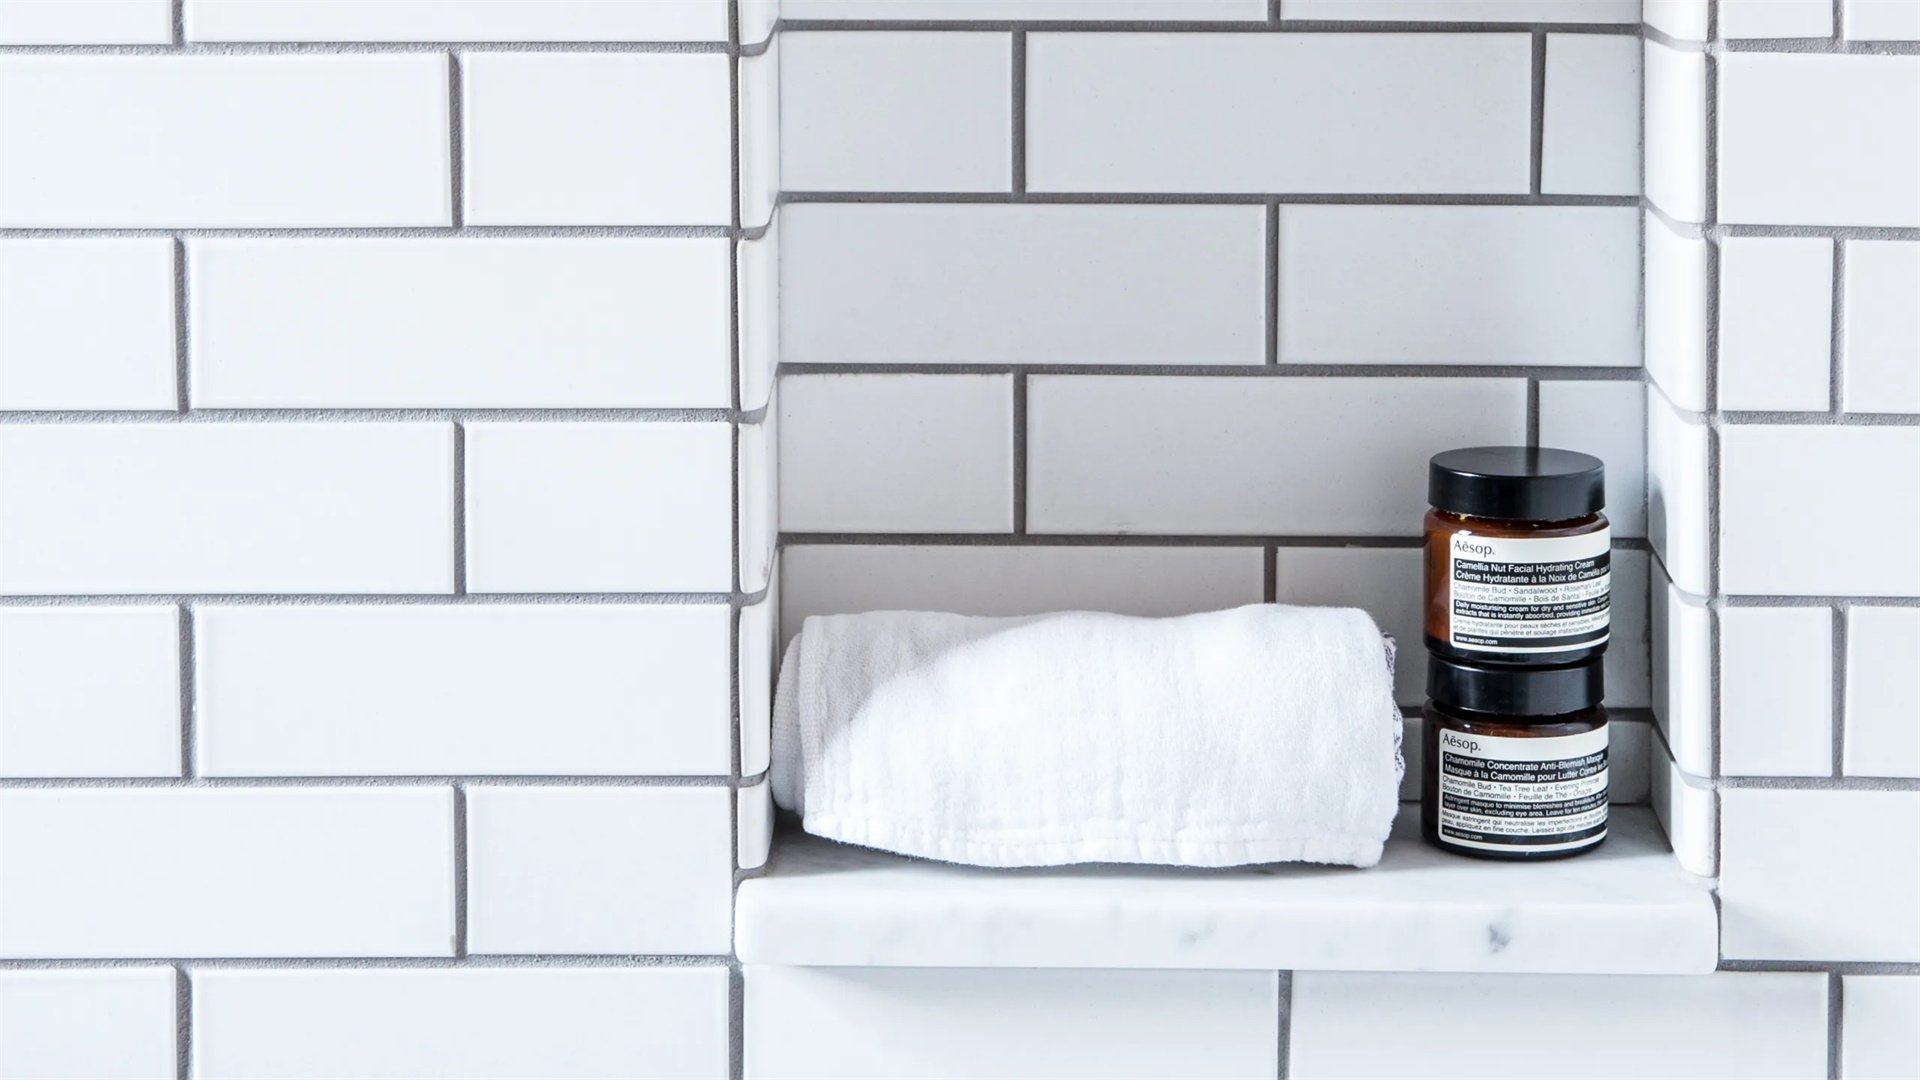
🚿 Method Three: Mirror Cabinets and Medicine Cabinets
Mirror cabinets and medicine cabinets combine reflection with storage, often featuring shelves behind mirrors. This method is perfect for keeping essentials handy while saving wall space.
Advantages
- Serves dual purposes as a mirror and storage unit, reducing the need for separate pieces.
- Conceals items like medications or toothbrushes, maintaining a clean, minimalist bathroom look.
- Utilizes wall space efficiently, especially above sinks where counter space is limited.
- Often includes built-in lighting or magnification, enhancing functionality for grooming tasks.
- Easy to retrofit, with many models designed to fit standard wall cavities or replace existing mirrors.
Disadvantages
- Storage depth is limited, restricting bulkier items and potentially causing clutter inside.
- Installation can be tricky, especially for recessed cabinets that require wall cutting and electrical work.
- May steam up during showers, obscuring the mirror and requiring frequent wiping.
- Can be expensive for high-end models with features like defoggers or integrated sockets.
- Hinges and doors may wear out over time, necessitating repairs or replacements.
How to Implement
- Measure the area: Determine the space above your sink or vanity. Choose a cabinet size that fits without overwhelming the room or obstructing other fixtures.
- Select a cabinet type: Opt for surface-mounted cabinets for easy installation, or recessed ones for a flush look. Consider features like mirrored doors, interior shelves, or lighting.
- Install carefully: For recessed cabinets, turn off electricity and cut into the wall, ensuring no pipes or wires are damaged. For surface mounts, use sturdy brackets and level the unit.
- Organize interior: Use small bins or dividers inside to categorize items like first-aid supplies, cosmetics, or shaving gear. Keep daily essentials on lower shelves for easy access.
- Maintain regularly: Clean the mirror with glass cleaner and wipe down shelves monthly. Check hinges and latches for smooth operation, lubricating if necessary.
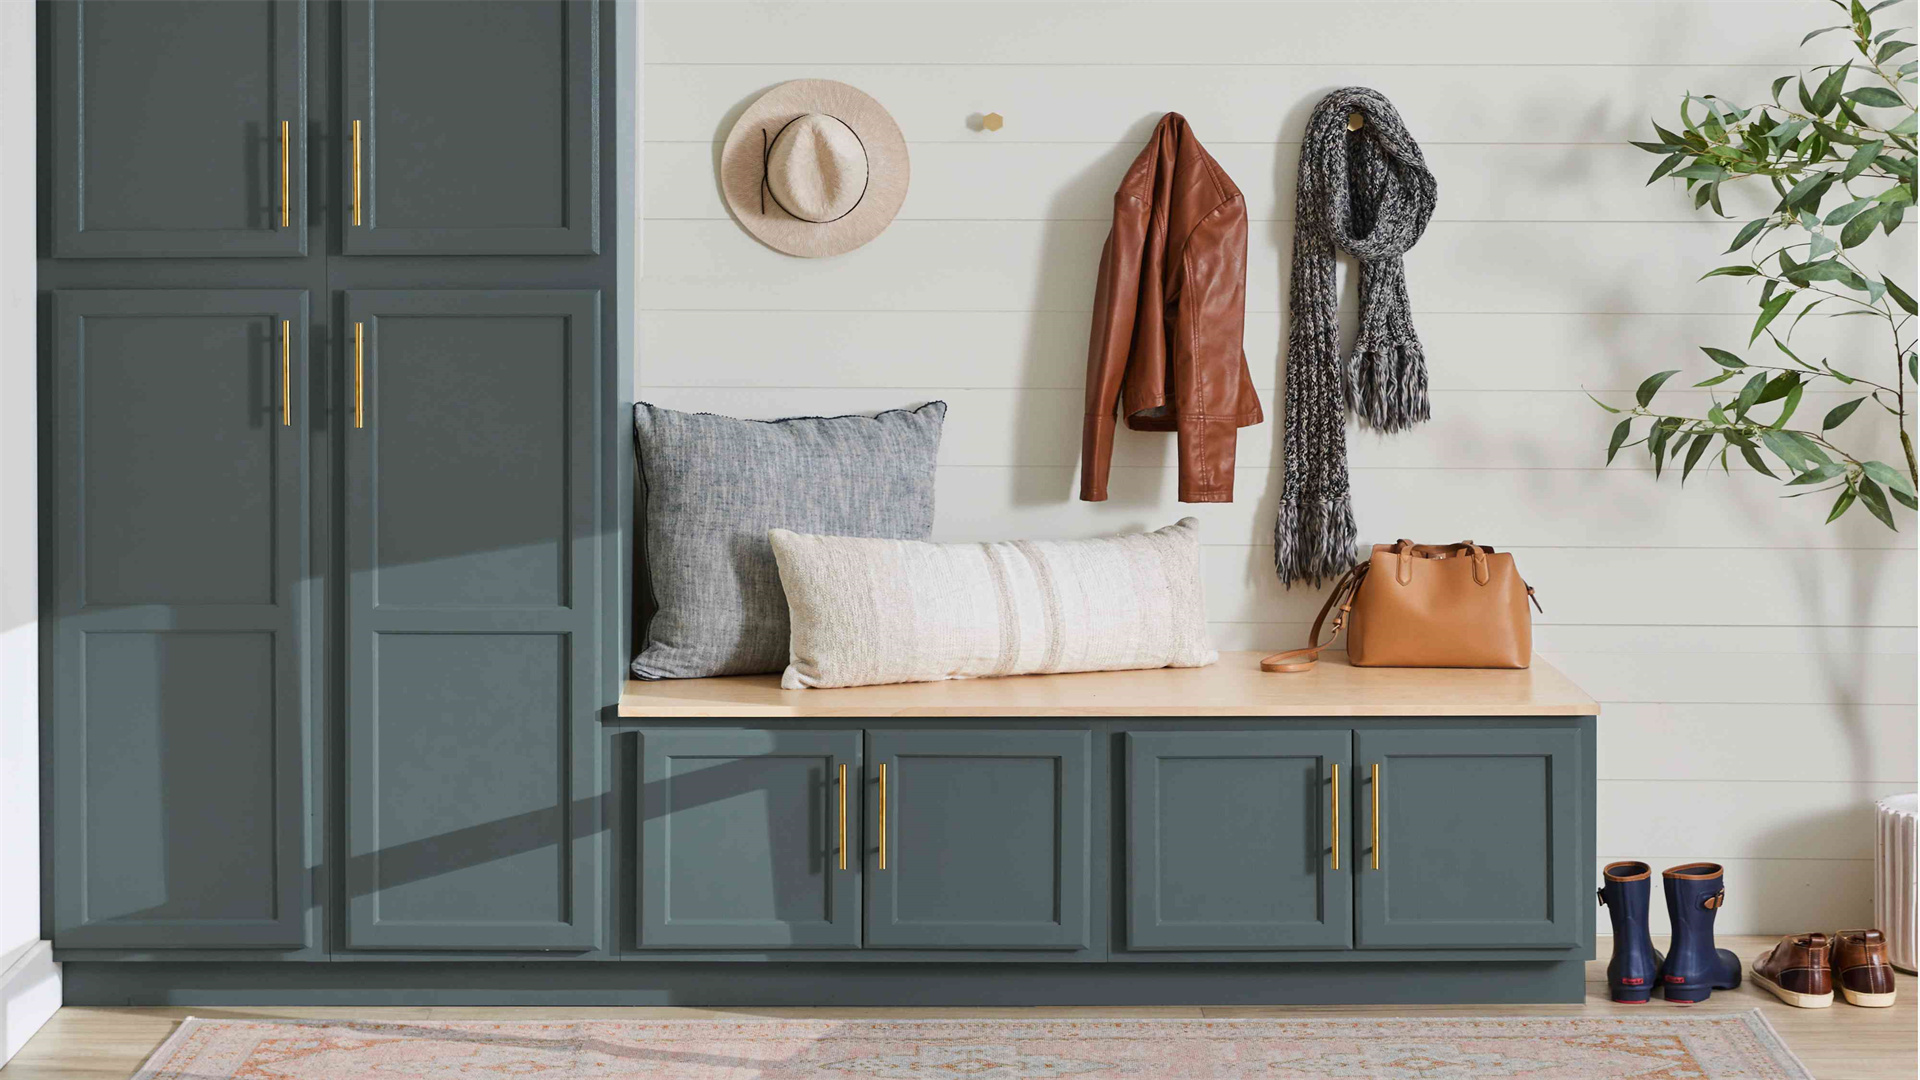
🚪 Hallways and Corners: Often Overlooked Spaces
Hallways and corners are frequently neglected but offer prime opportunities for storage or decor. These ideas transform these areas into functional zones without sacrificing flow.
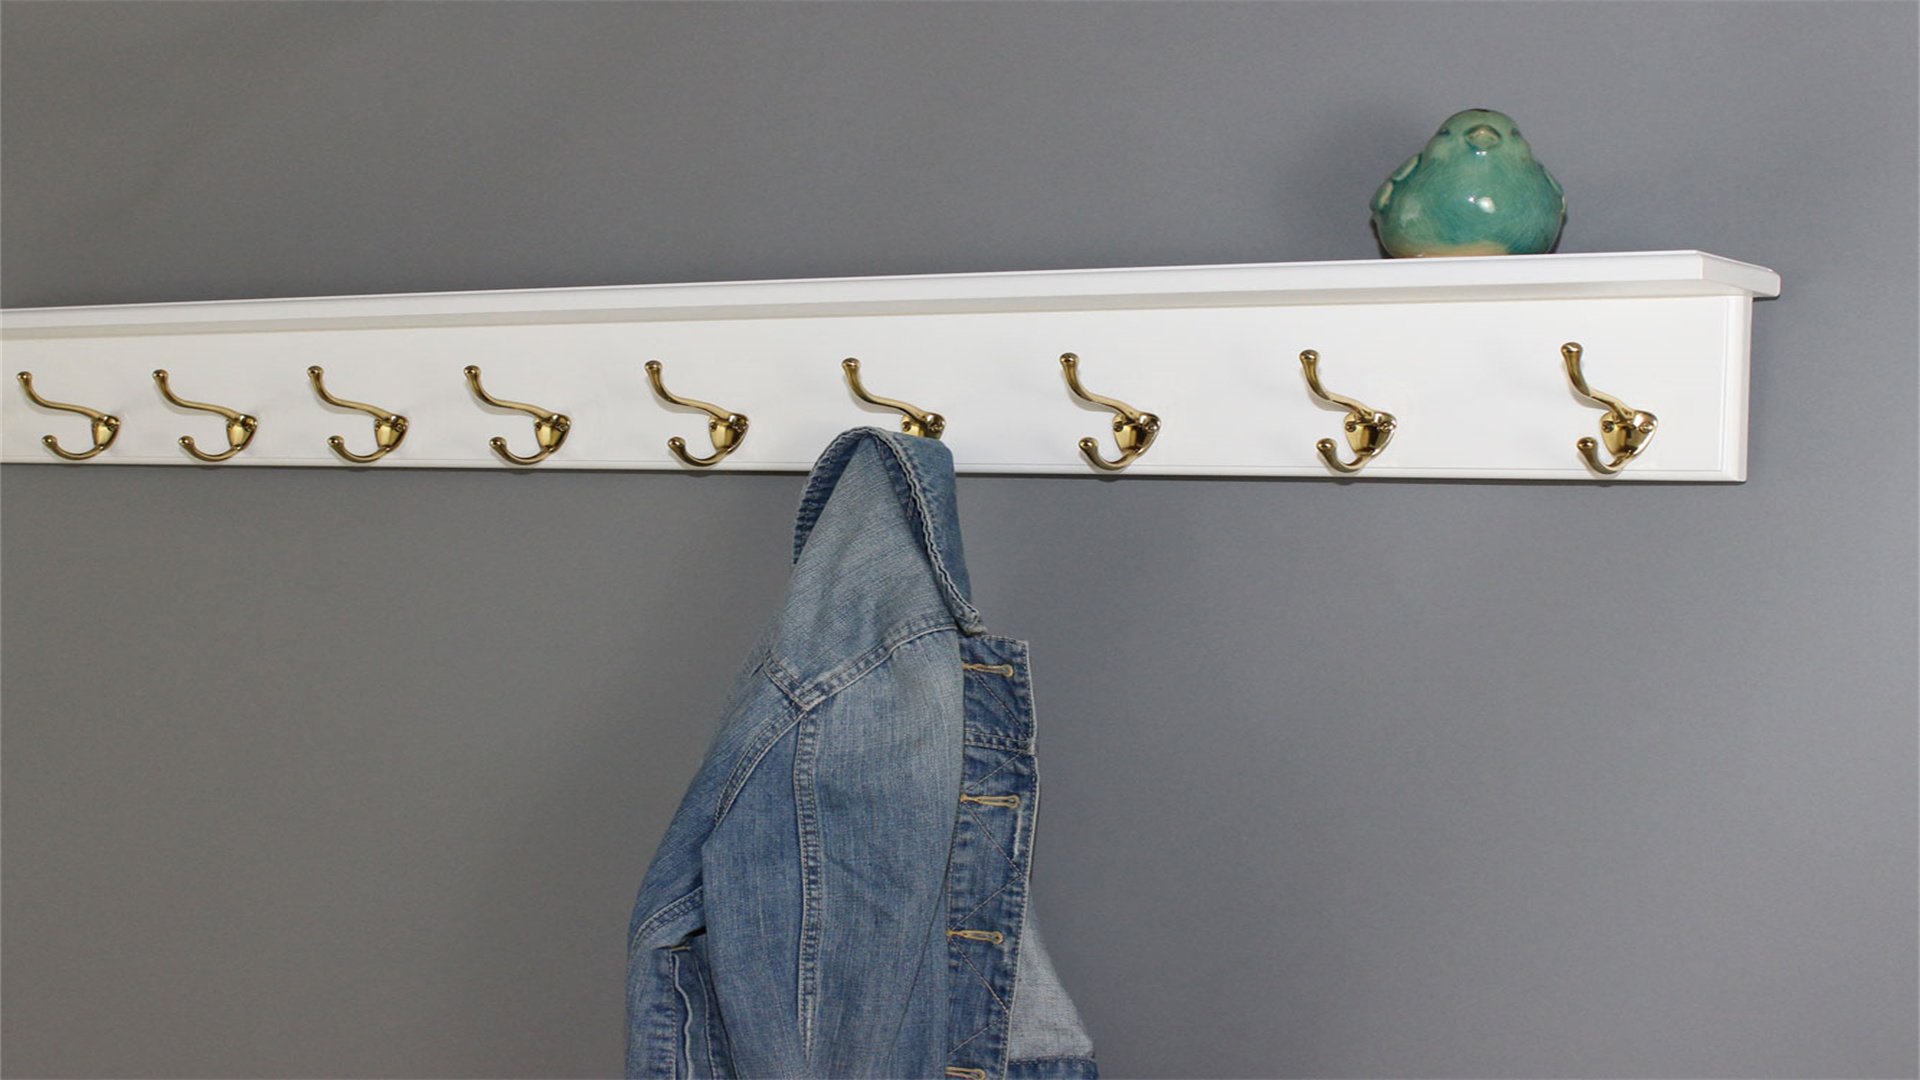
📏 Method One: Narrow Shelving and Hooks
Narrow shelving and hooks use slim profiles to fit into tight hallways or corners, providing storage for keys, coats, or decor. This approach is ideal for entryways or transitional spaces.
Advantages
- Maximizes unused wall space in narrow areas, adding storage without impeding passage.
- Enhances organization for daily items like bags or mail, reducing clutter in main rooms.
- Easy to install with minimal tools, making it accessible for DIY beginners or renters.
- Can be decorative, with stylish hooks or floating shelves adding personality to bland hallways.
- Cost-effective, as basic shelves and hooks are inexpensive and widely available.
Disadvantages
- Limited weight capacity, so heavy items like winter coats may require sturdier installations.
- Can create visual clutter if overfilled, especially in small, dark hallways.
- Hooks may damage walls if removed, leaving holes or paint chips.
- Shelves may collect dust in high-traffic areas, requiring frequent cleaning.
- Not suitable for deep storage, best for shallow items like hats or small baskets.
How to Implement
- Assess the space: Measure hallway width and corner angles to ensure shelves or hooks won't obstruct movement. Consider traffic patterns for convenient placement.
- Choose storage elements: Select slim floating shelves for decor or books, and hooks for coats or umbrellas. Opt for materials that match your home's style, such as wood for warmth or metal for modernity.
- Install securely: Use wall anchors for shelves in drywall, or drill into studs for heavier loads. Space hooks evenly for a balanced look, ensuring they're at accessible heights.
- Organize items: Assign hooks for each family member's items, or use shelves for seasonal decor like vases or photo frames. Add baskets for small items like gloves or scarves.
- Maintain regularly: Dust shelves weekly and tighten hooks as needed. Rotate displayed items to keep the area fresh and inviting.