Budget-Friendly DIY Shelving Projects to Maximize Vertical Space
In modern living, space is a premium commodity, especially in urban apartments and small homes. Vertical space—often overlooked—offers a goldmine of storage potential without expanding your footprint. DIY shelving projects are an excellent way to tap into this resource, combining functionality with personal style. This comprehensive guide delves into budget-friendly DIY shelving ideas that maximize vertical space, drawing inspiration from popular international websites and DIY communities. Whether you're a novice or a seasoned crafter, these projects are designed to be affordable, using materials like reclaimed wood, pipes, and everyday items. We'll explore various methods, each with clear advantages, disadvantages, and step-by-step implementation guides. By the end, you'll have a toolkit of ideas to transform your walls into organized, stylish storage solutions. Let's dive in and unlock the potential of your vertical spaces!
🪑 Project 1: Reclaimed Wood and Bracket Shelves
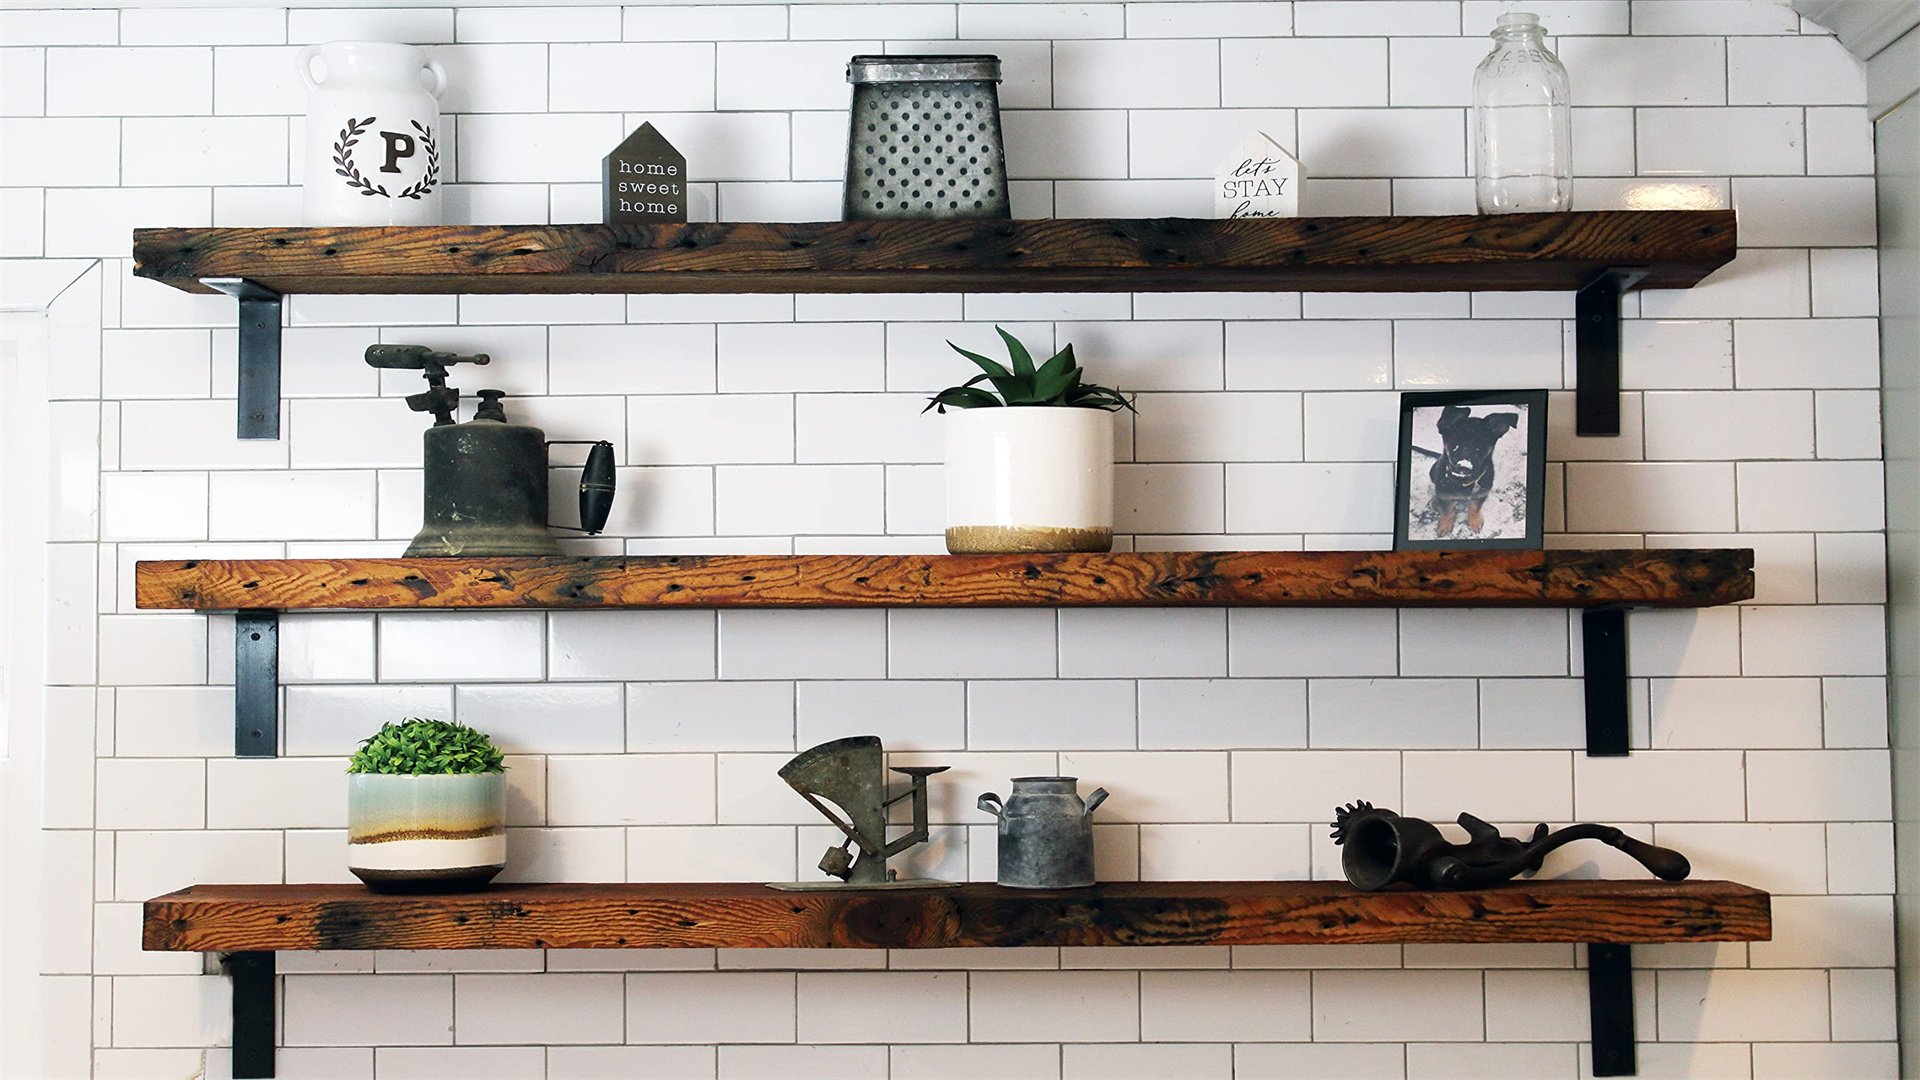
This classic DIY project involves using salvaged wood and simple brackets to create sturdy, rustic shelves. It's perfect for living rooms, kitchens, or bedrooms, adding warmth and character while utilizing wall space efficiently. Reclaimed wood can be sourced from pallets, old furniture, or construction sites, making it an eco-friendly and cost-effective option. The brackets, available at hardware stores, provide support and can be customized with paint or finishes. This project is ideal for beginners, requiring basic tools like a drill, level, and saw. We'll break down the process into manageable steps, ensuring you can achieve professional-looking results on a tight budget.
Advantages
- Reclaimed wood shelves are highly affordable, often costing under $20 per shelf if materials are sourced creatively.
- They offer a unique, rustic aesthetic that complements various decor styles, from industrial to farmhouse.
- The project is customizable in terms of size, shape, and finish, allowing you to tailor shelves to specific spaces.
- Additionally, using reclaimed materials reduces waste and environmental impact.
- The shelves are durable and can hold moderate weight, suitable for books, decor, or kitchen items.
- Installation is relatively straightforward, with brackets simplifying the mounting process.
Disadvantages
- Reclaimed wood may require extensive preparation, such as sanding, cleaning, or treating for pests, which can be time-consuming.
- The wood might have irregularities like knots or cracks, which could affect stability if not addressed.
- Weight capacity is limited compared to commercial shelves, so it's not ideal for heavy items like large appliances.
- Brackets can be visible, which might not suit minimalist designs, and improper installation can lead to wall damage or sagging.
- Sourcing consistent wood pieces can be challenging, affecting uniformity in multi-shelf setups.
How to Implement
- Gather Materials: Collect reclaimed wood planks (e.g., from pallets or old shelves), metal L-brackets, screws, wall anchors, a drill, level, tape measure, sandpaper, and optional paint or stain. Ensure the wood is dry and free of nails or debris.
- Prepare the Wood: Cut the wood to desired lengths using a saw—common sizes are 24 to 48 inches for width. Sand the surfaces thoroughly to smooth rough edges and remove splinters. Apply a coat of stain or paint if desired, allowing it to dry completely. This step enhances durability and appearance.
- Install Brackets: Mark the wall where shelves will go, using a level to ensure straight lines. Space brackets evenly, typically 16-24 inches apart depending on shelf length. Drill pilot holes, insert wall anchors for drywall, and secure brackets with screws. Double-check alignment with the level.
- Attach Shelves: Place the wood planks on top of the brackets. Drill screws from underneath the brackets into the wood to fix them in place. For a floating look, you can hide brackets by attaching them to the wall and then sliding the wood over, but this requires precise measurement.
- Final Touches: Load items onto the shelves gradually to test stability. Add decorative elements like plants or baskets to enhance visual appeal. Regularly inspect for loose screws or sagging, especially in humid environments.
🔩 Project 2: Industrial Pipe Shelving
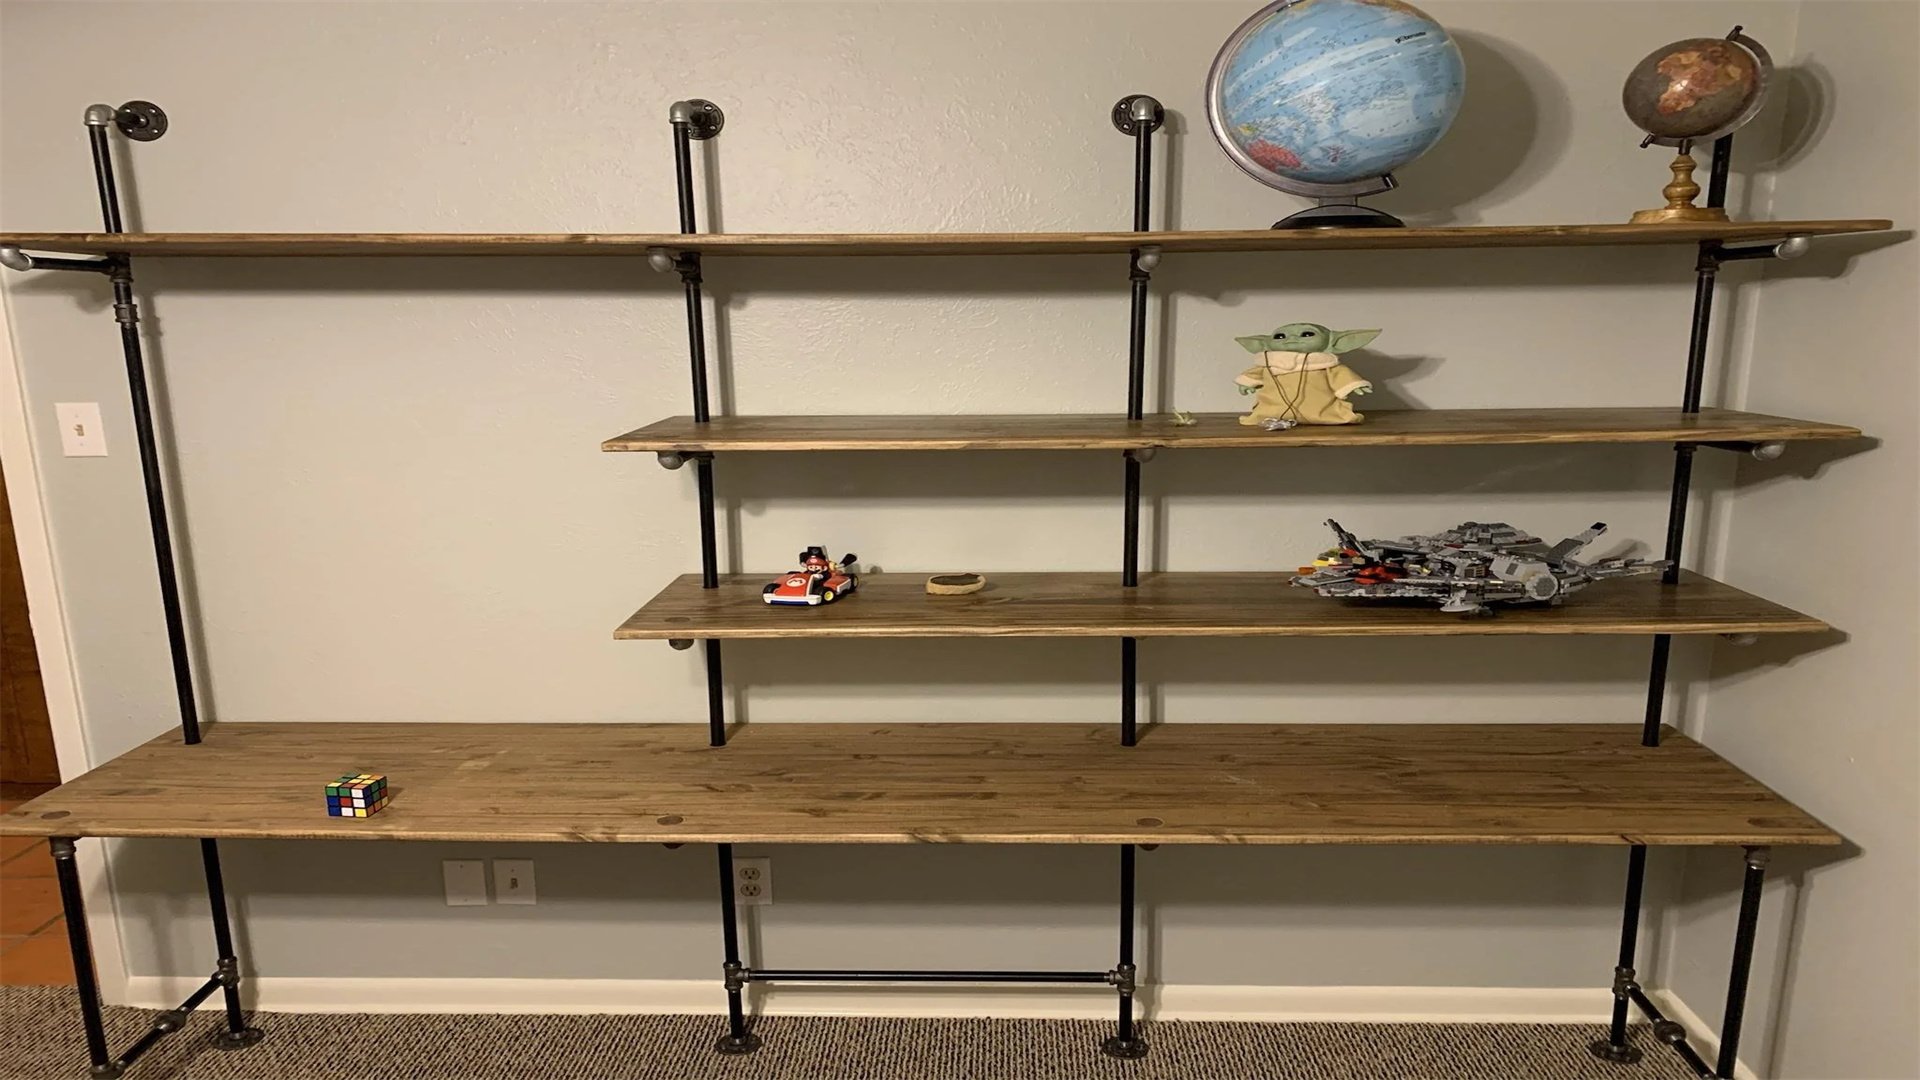
Inspired by warehouse aesthetics, industrial pipe shelving uses plumbing pipes and fittings to create robust, adjustable shelves. This project is excellent for maximizing vertical space in garages, offices, or kitchens, offering a modern, utilitarian look. Pipes and flanges are readily available at hardware stores, and shelves can be made from wood, glass, or metal. The design allows for easy height adjustment, making it versatile for different storage needs. While slightly more expensive than reclaimed wood, it remains budget-friendly by repurposing standard plumbing parts. We'll guide you through assembly, highlighting tips for customization and weight distribution.
Advantages
- Industrial pipe shelves are highly durable and can support heavy items like tools or cookware, thanks to the sturdy metal construction.
- They are easily customizable; pipes can be cut to any length, and fittings allow for various configurations (e.g., ladder-style or wall-mounted).
- The adjustable nature means shelves can be rearranged as needs change, maximizing vertical space efficiently.
- Aesthetically, they add an edgy, industrial vibe that pairs well with contemporary interiors.
- Installation is modular, requiring no complex joinery, and materials are often reusable for other projects.
Disadvantages
- The cost can add up if using many pipes and fittings, though buying in bulk or opting for black iron over copper reduces expenses.
- Pipes may require threading or cutting, which needs specialized tools or store assistance.
- The industrial look might not suit all decor styles, such as traditional or cozy spaces.
- Assembly can be time-consuming due to precise measurements and tightening of fittings.
- Additionally, pipes can rust if not treated, especially in humid areas, and shelves may wobble if not securely anchored to walls.
How to Implement
- Plan and Measure: Decide on shelf dimensions and layout—common setups include vertical pipes with horizontal shelves. Measure wall space and determine pipe lengths; a typical shelf might use 1-inch diameter pipes. Sketch a design, noting fitting types (e.g., flanges, elbows, tees) for support structures.
- Acquire Materials: Purchase pipes, fittings, wood planks for shelves, screws, wall anchors, a pipe cutter or hacksaw, wrench, drill, and level. Consider pre-cutting pipes at the store to save time. Opt for black iron pipes for a rustic look or galvanized for corrosion resistance.
- Prepare Shelves: Cut wood planks to size (e.g., 12x36 inches) and sand edges. Stain or paint as desired; darker finishes complement industrial themes. Drill holes in plank corners to fit over pipes if creating a floating effect, or simply rest planks on flanges.
- Assemble Pipe Framework: Start by attaching flanges to the wall at marked points, using anchors and screws for stability. Thread vertical pipes into flanges, then add fittings like tees or elbows to create horizontal supports. Use a wrench to tighten connections, ensuring they are secure but not over-tightened to avoid stripping threads.
- Install Shelves: Place wood planks on the pipe supports. For added security, screw planks to flanges or use pipe clamps. Check levelness and adjust pipe heights as needed. Test weight capacity with items, and consider adding diagonal braces for taller units to prevent swaying.
🛋️ Project 3: Ladder Shelving Units
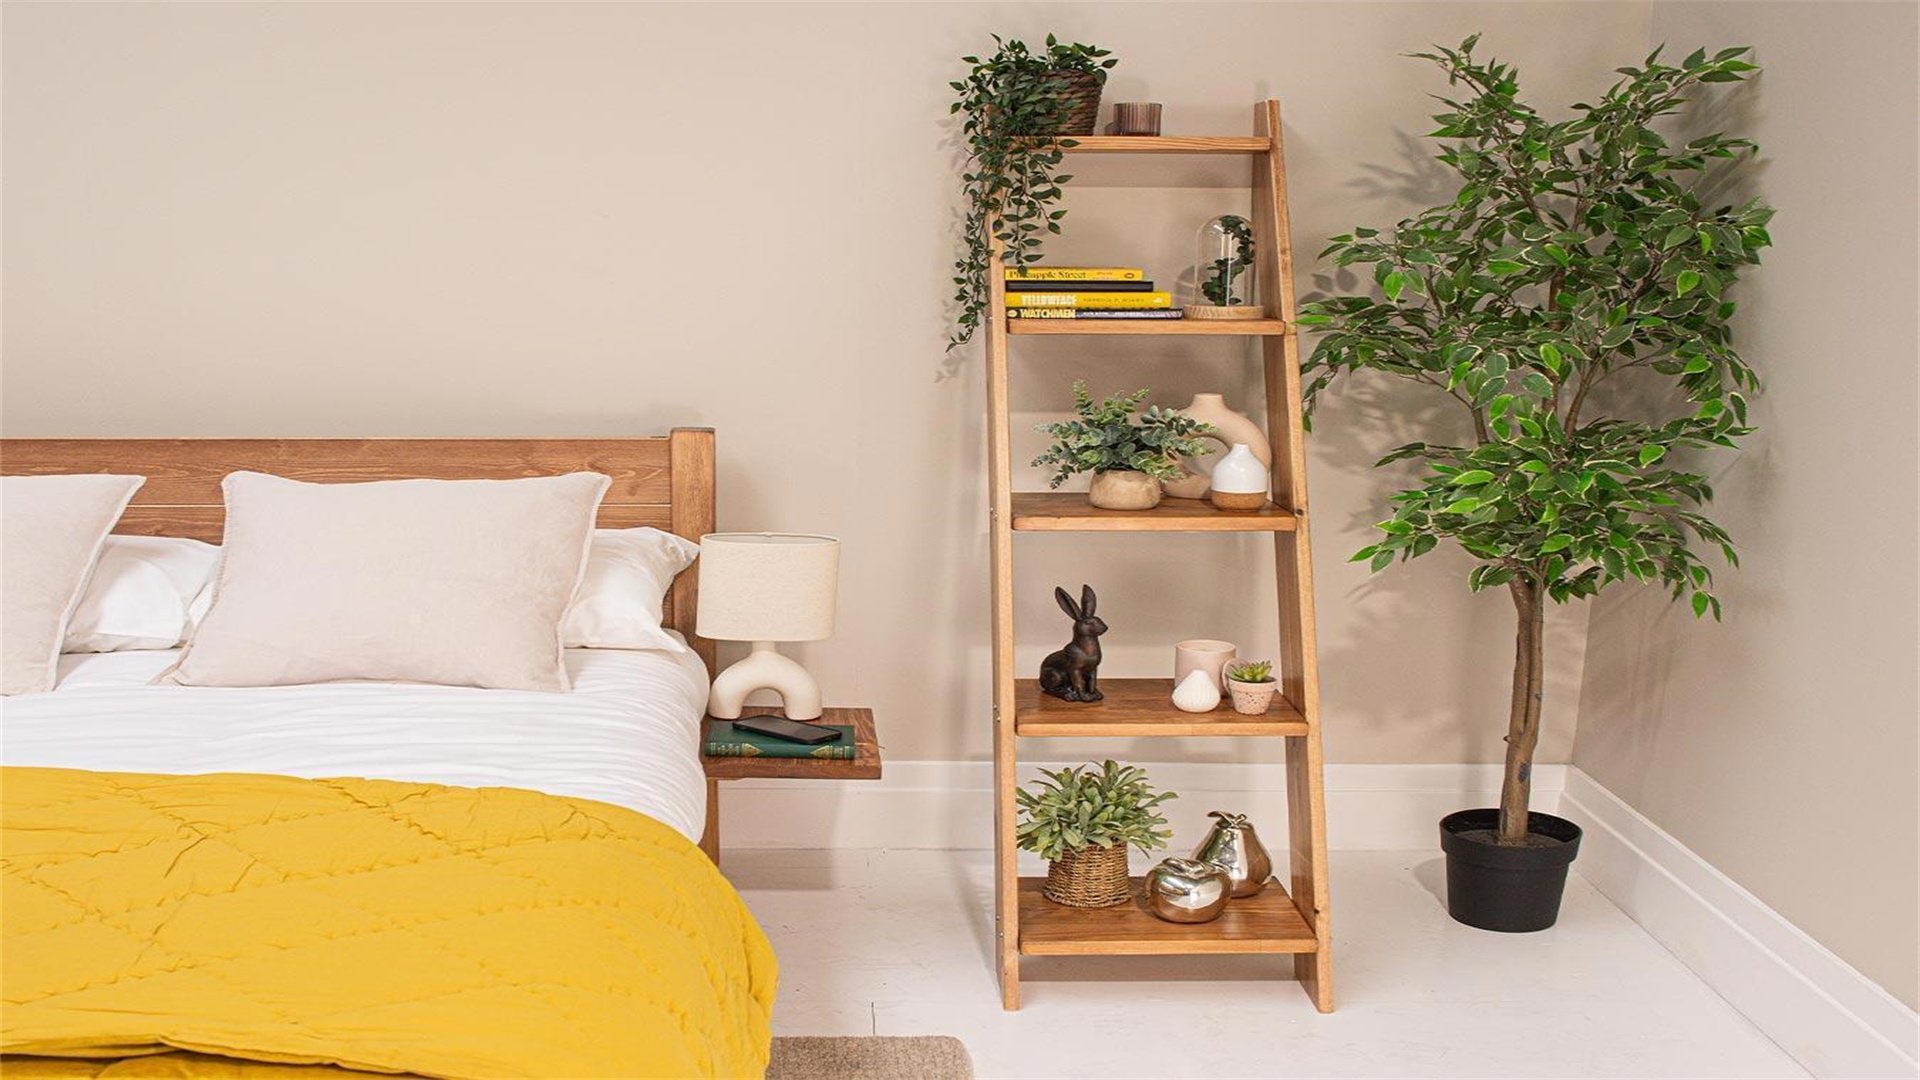
Ladder shelving involves repurposing an old ladder or building one from scratch to create leaning, space-saving storage. This project maximizes vertical space by utilizing narrow footprints, ideal for corners or beside furniture. It adds a vintage, casual charm to rooms and can hold plants, books, or decorative items. Materials are low-cost—often just a wooden ladder and shelves—making it a budget-friendly option. The leaning design requires no wall mounting in some cases, reducing installation hassle. We'll explore how to adapt ladders for stability and style, with tips for balancing aesthetics and function.
Advantages
- Ladder shelves are incredibly affordable, especially if using a discarded ladder or cheap lumber.
- They are easy to assemble, often requiring just screws and basic tools, and can be completed in a few hours.
- The leaning design saves wall space and allows for flexible placement; you can move it around without damaging walls.
- Aesthetically, they offer a charming, rustic look that enhances bohemian or farmhouse decor.
- Shelves can be adjusted at different heights, accommodating various item sizes.
- Additionally, they are lightweight and portable, suitable for renters.
Disadvantages
- Stability can be an issue if not properly balanced; leaning shelves may tip if overloaded or on uneven floors.
- Weight capacity is limited compared to wall-mounted options, so they're best for lighter items.
- The design occupies floor space, which might not work in very tight areas.
- Ladders may require reinforcement to hold shelves securely, and old ladders might need repairs or sanding.
- Aesthetically, the rustic look may clash with modern interiors, and shelves can collect dust in open designs.
How to Implement
- Source a Ladder: Find an old wooden ladder at thrift stores, garage sales, or online marketplaces. Ensure it's sturdy and free of rot. Alternatively, build a simple ladder using two long wooden boards (e.g., 2x4s) and shorter rungs, assembling with screws and wood glue.
- Prepare the Ladder: Clean the ladder thoroughly, removing dirt or paint chips. Sand it down to smooth surfaces and apply a sealant or paint for durability. If building from scratch, cut boards to desired height (e.g., 6 feet) and attach rungs at regular intervals using brackets or dowels.
- Create Shelves: Cut wood planks for shelves to fit between ladder sides—common widths are 12-18 inches. Sand edges and finish with paint or stain. For added style, use reclaimed wood or plywood. Determine shelf placement by marking where they'll rest on ladder rungs.
- Attach Shelves: Place shelves on ladder rungs, ensuring they are level. Secure them with L-brackets screwed from underneath or by drilling directly into rungs. For a removable option, use shelf pins or simply rest shelves without fastening, but this reduces stability.
- Set Up and Secure: Lean the ladder against a wall at a slight angle for stability. Use wall anchors or straps to secure the top to the wall if needed, especially in households with children or pets. Arrange items evenly to maintain balance, and avoid overloading one side.
📦 Project 4: Crate or Box Shelving
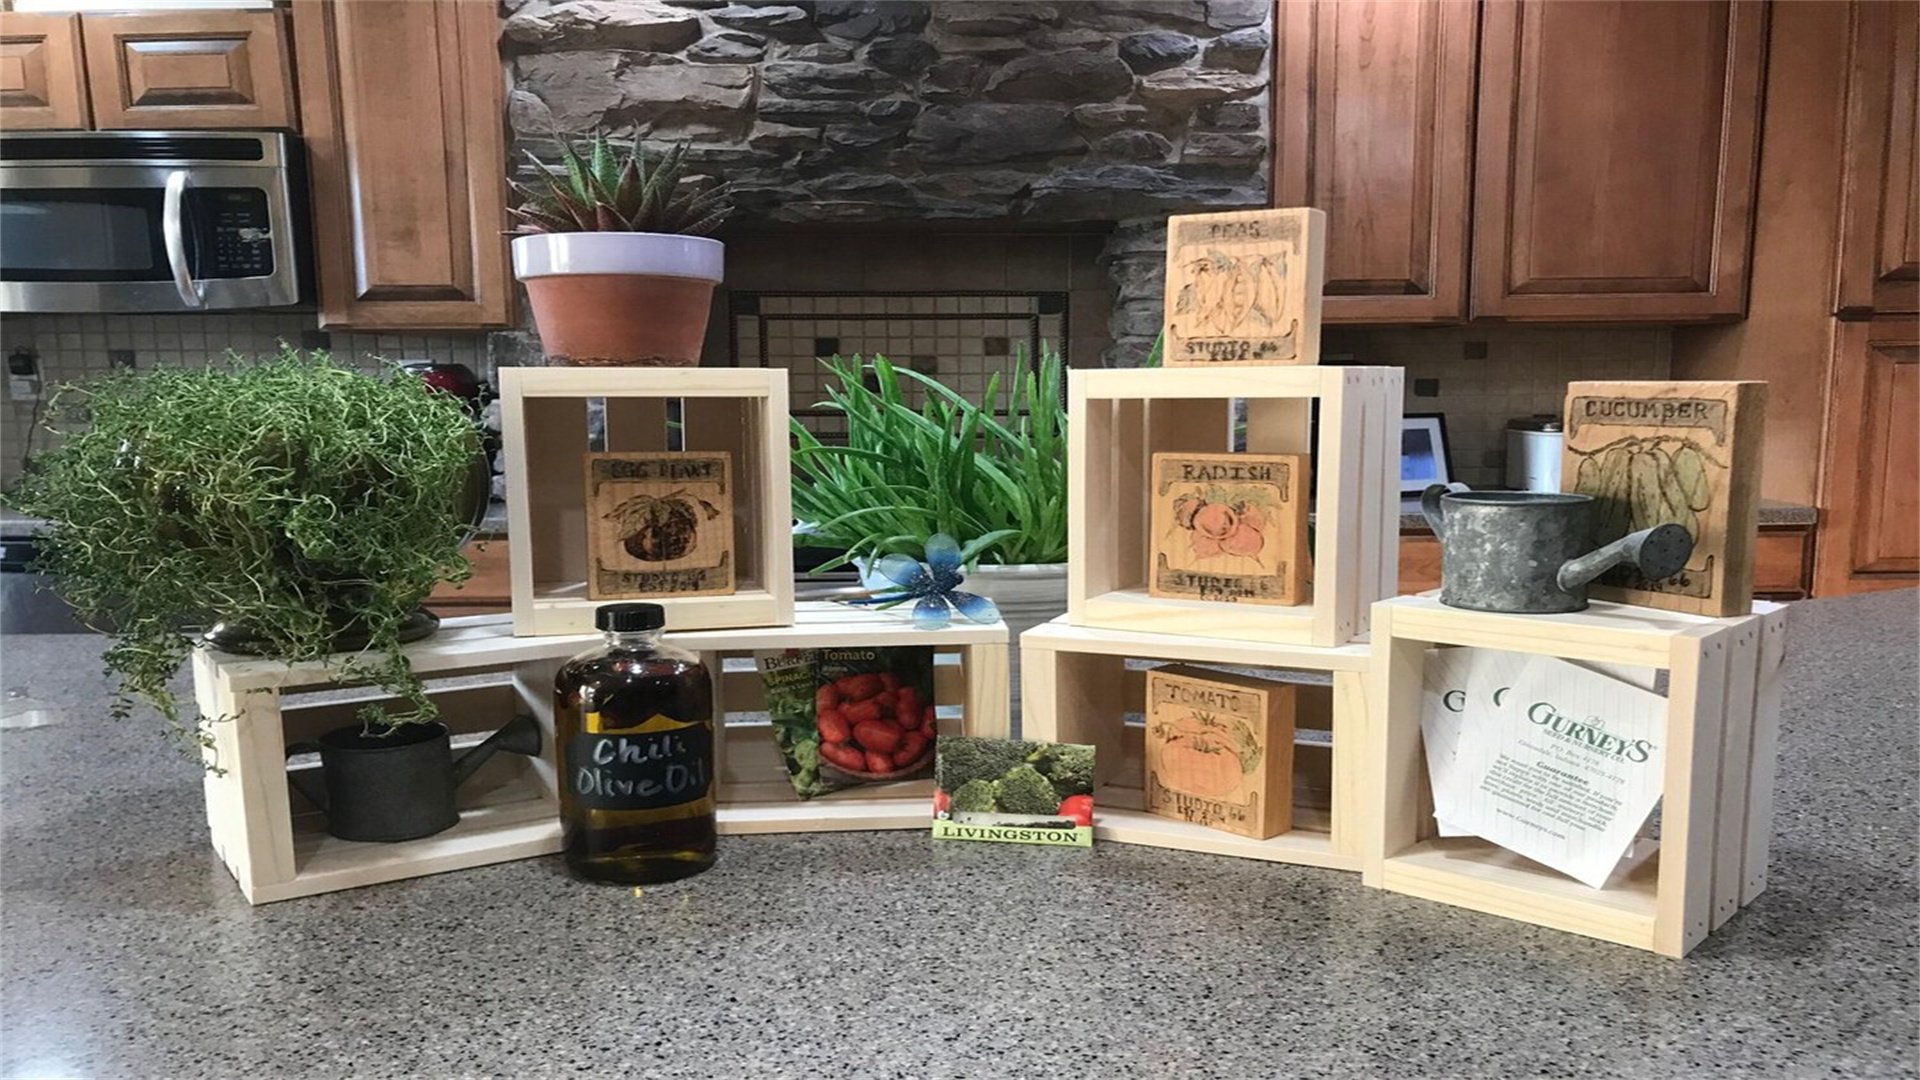
Using wooden crates or boxes as modular shelving units is a creative, budget-friendly way to maximize vertical space. Crates can be stacked, wall-mounted, or arranged in grids to form custom storage solutions for books, toys, or pantry items. They are often inexpensive at craft stores or can be made from scrap wood, offering a rustic, organized look. This project is highly versatile, allowing for rearrangement as needs change. We'll cover various configurations, from simple stacks to wall-hung displays, with a focus on durability and aesthetics.
Advantages
- Crate shelving is extremely low-cost, with crates priced as low as $5 each, and DIY versions even cheaper.
- It's highly modular; crates can be stacked horizontally or vertically to fit any space, and rearranged easily for flexibility.
- The project requires minimal tools—just screws or brackets for mounting—and can be completed quickly.
- Aesthetically, crates add a warm, rustic touch and can be painted or stained to match decor.
- They are also portable, making them ideal for renters or temporary setups.
- Additionally, crates often have handles, aiding in mobility.
Disadvantages
- Crates may not be as sturdy as solid wood shelves, especially if made from thin wood, limiting weight capacity.
- Stacked crates can wobble if not secured, posing safety risks.
- The open-back design means items might fall through, requiring liners or backing.
- Aesthetically, the look can appear too casual or cluttered if not arranged neatly.
- Sourcing uniform crates can be tricky, affecting symmetry, and they may require treatment for splinters or durability.
- Wall-mounted versions need proper anchoring to hold weight.
How to Implement
- Select Crates: Choose wooden crates from craft stores, farmers' markets, or online. Opt for sturdy ones with even dimensions. Alternatively, build crates using plywood and nails for a custom size. Standard sizes are around 12x12 inches, but vary based on needs.
- Prepare Crates: Sand crate surfaces to remove rough edges and splinters. Apply a coat of paint, stain, or sealant to enhance appearance and durability. Let dry completely. If using for pantry or bathroom, consider adding a waterproof liner.
- Plan Configuration: Decide on layout—options include stacking crates in a pyramid shape, mounting them in a grid on walls, or arranging them as a bookshelf. Measure the wall or floor space to ensure fit. Use graph paper to sketch designs for complex setups.
- Assemble Units: For stacked crates, secure them together using L-brackets or screws drilled through sides into adjacent crates. For wall-mounted crates, attach picture-hanging hardware or French cleats to crate backs, then screw into wall studs. Ensure level alignment during installation.
- Finalize and Load: Place crates in desired configuration, checking stability. Add non-slip pads under stacked units if on smooth floors. Organize items by category, using bins or baskets inside crates for smaller items. Regularly inspect for loose connections.
🚿 Project 5: Rope and Wood Suspension Shelves
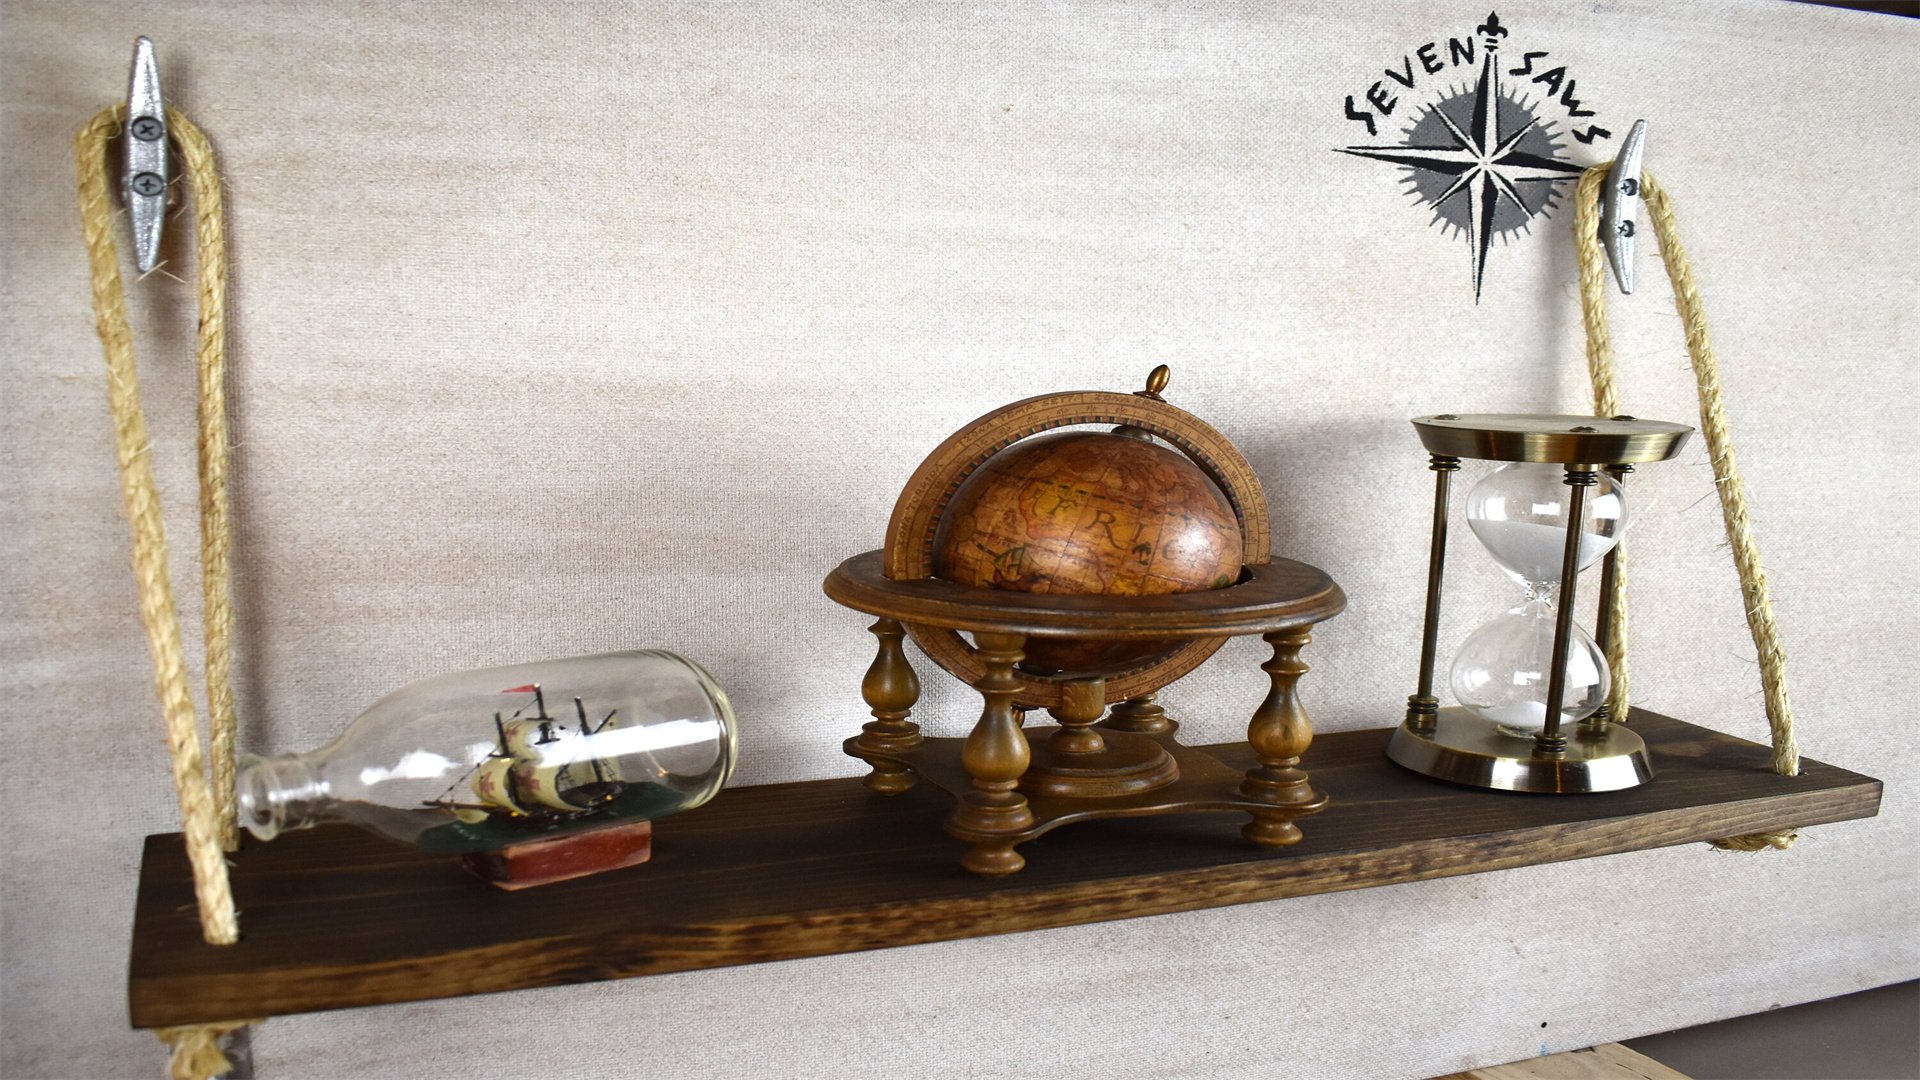
This project combines wood shelves with rope or cord for a floating, bohemian look that maximizes vertical space without bulky supports. Ideal for bathrooms, bedrooms, or nurseries, it adds a light, airy feel while providing functional storage. Materials are simple: wood planks, rope, and basic hardware. The shelves appear to float, creating visual interest and saving floor space. Installation involves knotting or clamping techniques, making it accessible for DIYers. We'll detail how to achieve secure, level shelves with various rope styles, from natural jute to colorful synthetic cords.
Advantages
- Rope shelves are very affordable, often costing under $30 for multiple shelves, using inexpensive rope and scrap wood.
- They offer a unique, minimalist aesthetic that complements coastal or Scandinavian decor.
- The design is versatile; shelves can be hung at different heights and adjusted by retying knots.
- Installation is tool-light, requiring only drills, screws, and possibly clamps.
- They are lightweight and easy to relocate, suitable for rental homes.
- Additionally, rope adds texture and softness to spaces, reducing the industrial feel of other shelving.
Disadvantages
- Weight capacity is limited, making them suitable only for light items like small plants or books.
- Rope can stretch or wear over time, especially in humid environments, requiring periodic retightening.
- Knots may slip if not secured properly, leading to shelf falls.
- The design requires ceiling or wall anchors, which might not be feasible in all spaces (e.g., concrete ceilings).
- Aesthetically, the rustic rope may not suit formal settings, and shelves can swing if not stabilized.
- Installation can be tricky to get level, especially with multiple shelves.
How to Implement
- Gather Materials: Obtain wood planks (e.g., 1x6 boards), sturdy rope (like manila or polyester), ceiling hooks or wall anchors, a drill, sandpaper, and optional cleats or clamps. Choose rope thickness based on weight—1/2 inch diameter is common for medium loads.
- Prepare Wood Shelves: Cut wood to desired lengths (e.g., 24 inches) and sand edges smooth. Drill four holes near corners of each plank for rope passage—holes should be slightly larger than rope diameter. Finish wood with sealant or paint to protect against moisture.
- Install Anchors: Mark points on ceiling or wall where shelves will hang, ensuring they are level and spaced appropriately. Install heavy-duty hooks or anchors into studs or beams for support. Test anchors with weight before proceeding.
- Thread and Knot Rope: Cut rope into four equal lengths per shelf, allowing extra for knots. Thread ropes through shelf holes from bottom to top. Above the shelf, tie secure knots like figure-eight or stopper knots to hold shelf in place. Adjust height by knotting at desired levels.
- Hang and Secure: Attach rope ends to ceiling hooks using knots or carabiners. Ensure shelves are level by adjusting knot positions; use a level during hanging. For added stability, add a drop of glue to knots or use clamps under shelves. Test with lightweight items initially.
🔲 Project 6: Wall-Mounted Grid Shelving
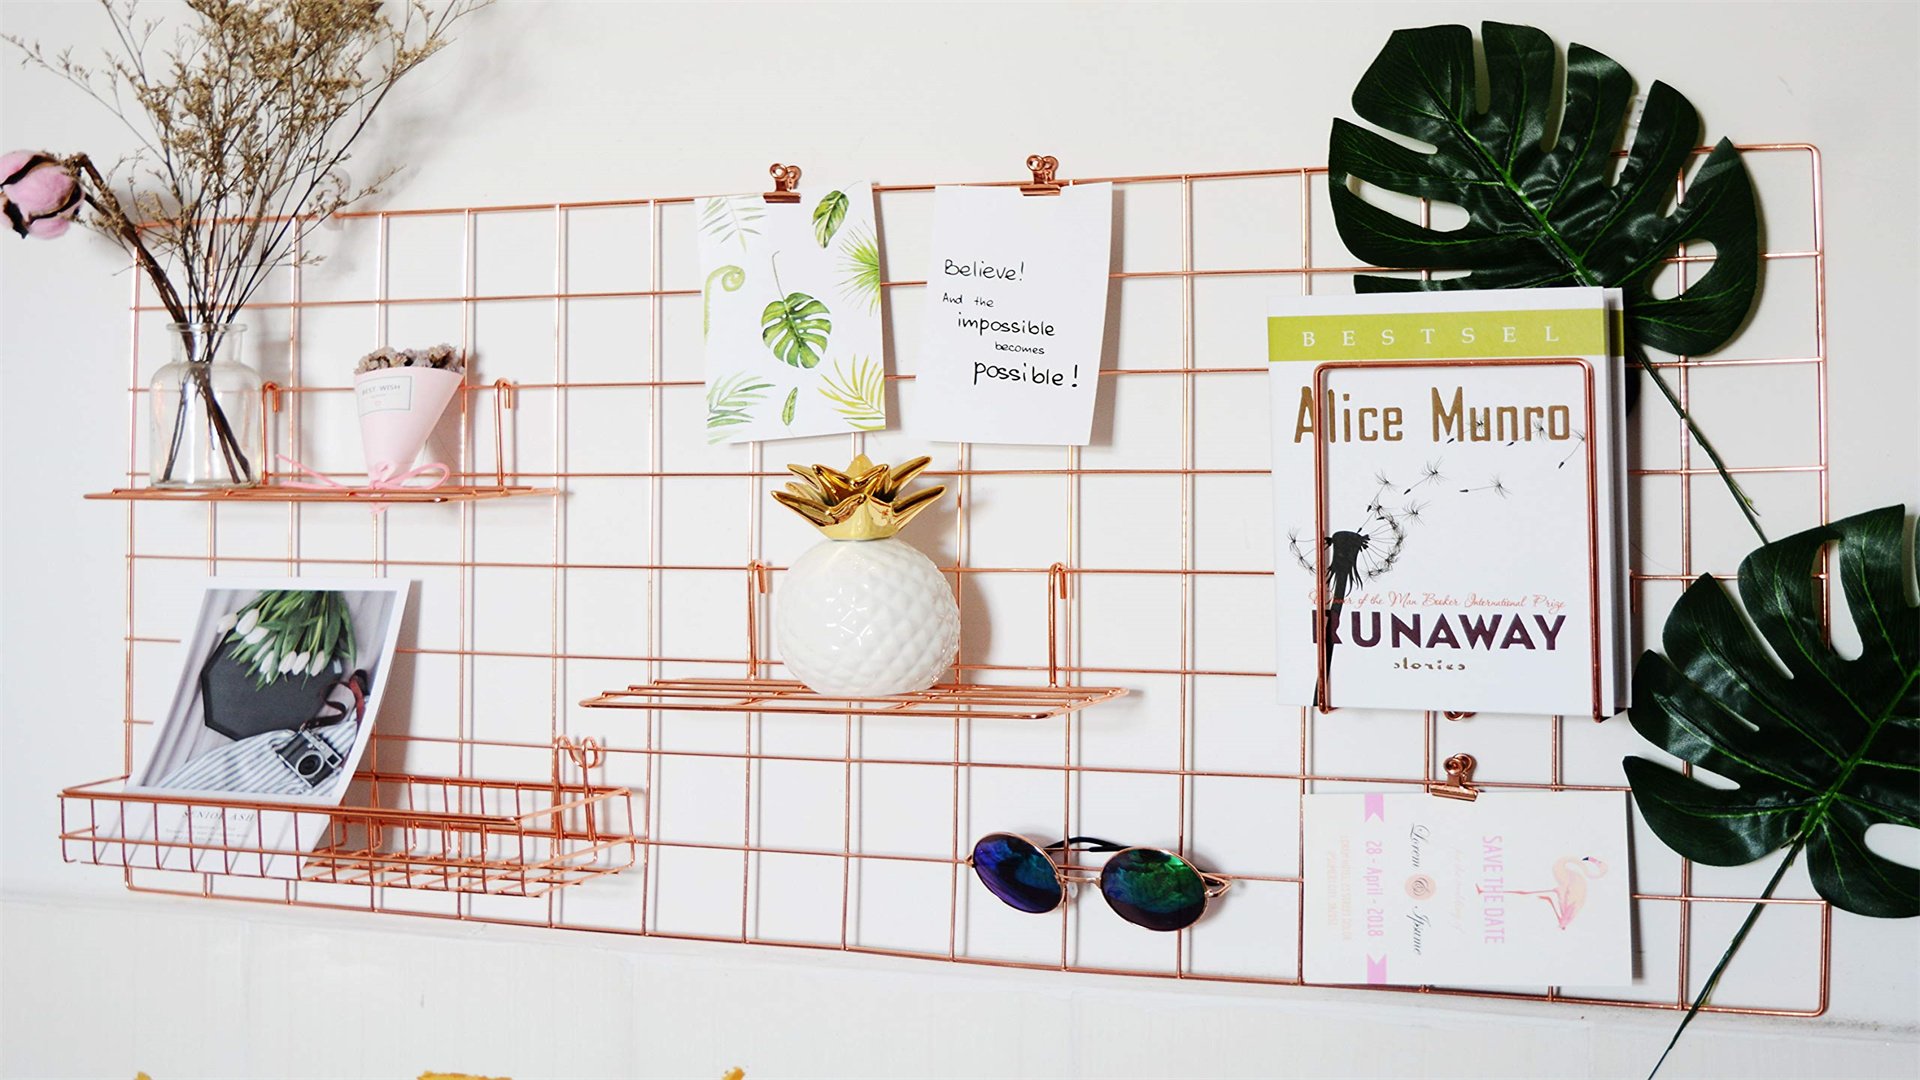
Grid shelving uses metal or wood grids mounted on walls to create modular, geometric storage. This project maximizes vertical space by allowing shelves to be attached at various points, perfect for small rooms like offices or kitchens. Grids are affordable at home improvement stores and can be customized with hooks, baskets, or shelves. The design is sleek and modern, offering flexibility to rearrange components as needed. We'll explore how to install grids securely and attach accessories, focusing on budget-friendly materials like wire grids or DIY wooden lattices.
Advantages
- Grid shelving is highly customizable; you can add or remove shelves and hooks without tools, adapting to changing storage needs.
- It's space-efficient, using wall surfaces without protruding far, ideal for narrow spaces.
- Materials are low-cost, especially wire grids, and installation is simple with basic hardware.
- Aesthetically, grids offer a clean, organized look that suits modern or industrial interiors.
- They are great for displaying items like plants or kitchen utensils, and grids can be painted to match walls.
- Additionally, they are easy to clean and maintain.
Disadvantages
- Weight capacity is limited, particularly for wire grids, which may bend under heavy loads.
- Installation requires wall anchors or studs, which can be challenging on plaster or tile walls.
- Grids may collect dust in openings, requiring frequent cleaning.
- Aesthetically, the industrial look might not blend with traditional decor.
- Accessories like shelves or baskets can add to costs if purchased separately.
- DIY wooden grids require more time and skill to build, and uneven mounting can cause grids to sag.
How to Implement
- Choose Grid Type: Select metal wire grids (common in closet systems) or build wooden grids using slats. Metal grids are prefabricated and inexpensive; wooden grids offer a custom look. Measure wall space to determine grid size—typical units are 24x36 inches.
- Prepare Wall and Grids: Locate wall studs using a stud finder and mark positions. If using metal grids, they may come with mounting hardware; for wood, assemble slats into a grid pattern using screws or dowels. Sand and finish wood grids with paint or stain.
- Mount Grids: Secure grids to wall using brackets or screws into studs. For drywall without studs, use heavy-duty anchors. Ensure grids are level and flush against the wall. For large grids, use multiple mounting points to distribute weight.
- Attach Shelves and Accessories: Use S-hooks or specialized clips to hang shelves, baskets, or hooks from grid openings. Shelves can be made from wood or metal and sized to fit grid dimensions. Arrange accessories at varying heights to maximize vertical storage.
- Organize and Maintain: Load items onto shelves, distributing weight evenly to prevent grid distortion. Periodically check mounts for tightness and clean grids with a damp cloth. Reconfigure accessories as needed for seasonal changes or new storage needs.
📐 Project 7: Corner Shelving Units
Corner shelving exploits often-wasted corner spaces, providing storage without occupying valuable wall areas. This project involves building or installing shelves specifically designed for corners, using materials like wood, pipes, or brackets. It's perfect for small rooms, bathrooms, or kitchens, where every inch counts. Corner shelves can be triangular, floating, or ladder-style, adding visual interest to awkward spaces. We'll cover various DIY approaches, from simple bracket installations to custom-built units, emphasizing budget-friendly techniques.
Advantages
- Corner shelves maximize underutilized space, turning dead corners into functional storage.
- They are cost-effective, often using scrap wood or inexpensive brackets, and can be built to fit exact dimensions.
- Installation is relatively easy, with many designs requiring only basic tools.
- Aesthetically, they add depth and dimension to rooms, making spaces feel larger.
- Shelves can be tailored for specific uses, like plant displays or book nooks.
- Additionally, they reduce clutter by providing storage without encroaching on walkways.
Disadvantages
- Corner installations can be tricky due to angled walls, requiring precise measurements and cuts.
- Weight capacity may be limited if not properly supported, especially for floating designs.
- Accessing corner shelves can be awkward, particularly in tight spaces, making them less practical for frequently used items.
- Aesthetically, if not designed well, they can look cramped or mismatched.
- DIY builds might involve complex angles, needing advanced woodworking skills.
- Also, corners may have uneven surfaces, complicating mounting.
How to Implement
- Design and Measure: Assess the corner—measure angles (usually 90 degrees) and wall lengths. Decide on shelf type: triangular shelves cut to fit, or standard shelves mounted with corner brackets. Sketch a plan, including shelf sizes and spacing.
- Gather Materials: For triangular shelves, use plywood or solid wood; for bracket shelves, get metal corner brackets, wood planks, screws, anchors, a saw, drill, and level. Consider using reclaimed wood for a rustic touch.
- Build Shelves: For triangular shelves, cut wood into right triangles using a miter saw or template—common sizes are 12-inch legs. Sand edges and apply finish. For bracket shelves, cut rectangular planks to desired lengths.
- Install Supports: Mount corner brackets or wooden cleats on walls at marked levels. Use a level to ensure brackets are even on both walls. For floating shelves, install hidden brackets or build a wooden frame attached to studs.
- Attach Shelves: Place shelves on brackets or slide onto supports. Secure with screws from underneath or through sides. For triangular shelves, you may glue and nail them to cleats. Test stability by applying pressure, and adjust as needed.
Maximizing vertical space with budget-friendly DIY shelving projects is a rewarding endeavor that enhances both functionality and aesthetics in your home. From reclaimed wood and industrial pipes to ladder units and rope suspensions, each method offers unique advantages tailored to different needs and styles. By following the step-by-step guides outlined above, you can tackle these projects with confidence, using affordable materials and basic tools. Remember to prioritize safety by securing shelves properly and distributing weight evenly. These DIY solutions not only save money but also allow for personalization, turning blank walls into organized, stylish displays. Start with one project that suits your space, and gradually expand to unlock the full potential of your vertical areas. Happy building!